Setup the parameters that govern the way that the particular type of overtime works for times accumulated and transferred from the terminals. This includes the description of the overtime, the overtime rate that applies, whether it is for a 'Shift Day', 'Holiday' or 'Off Day'. It is possible to specify how many hours of normal time must be worked before the overtime rate applies and also to scale up the rate after a specified number of hours is worked.
Use 'Overtime Ranges' to allocate overtime hours to different overtime rates. For example an employee with 15 hours overtime may have the first 10 hours at one rate and the balance at another.
This can work in 2 ways, the first is where overtime is paid after a minimum number of standard hours have been worked, and the other is where overtime is paid at different rates regardless of any minimum hours.
![]() Method 1 - Minimum Hours
Method 1 - Minimum Hours
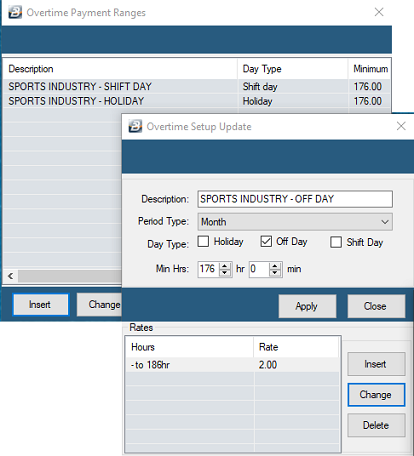
In the example below we have assumed that the standard working hours are 176 hours per month. When this number of hours have been worked then the employee is eligible to earn overtime at the rate of 2.0 for the next say 10 hours and then at a rate of 2.5 for hours worked beyond that.
To set up the overtime ranges: Step 1 Setup the Overtime Description and standard hours •Go to the 'Edit', then 'Overtime Ranges' menu options •Press 'Insert' to setup the type of overtime. •Press 'Apply' to save the entries made
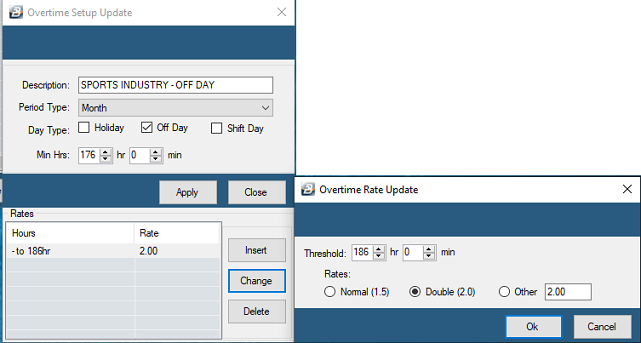
Step 2 Once the 'Apply' button has been pressed the 'Insert' button in the lower part of the form becomes active. Use this bottom section to setup the rates that apply to the overtime: •Press 'Insert' •Enter the Upper threshold of the overtime hours worked. In this example overtime hours worked above the 176 'Min. Hour' threshold and below the 186 hour 'Upper Threshold' will be paid at a rate of 2.0. •Use the radio button to select the rate that applies to the overtime range. •Press 'OK' to save the Overtime Rate
Step 3 Now that the overtime ranges have been setup, they now need to be allocated to the employees to which they apply.
This can be done for a group of employees, in bulk, to do this: •Go to the 'Edit', then 'Bulk Employee Master Update' menu options •Select the 'Apply Overtime Range' checkbox, then •Select 'Yes' under the 'Field Value' •Select the employees to which the overtime range applies by pressing the 'Employees' button •Press 'OK' to save the entry •A confirmation message then displays that the entry has been made, •Press 'OK' to confirm, then •Press the 'Close' button to close the screen and move to the next task.
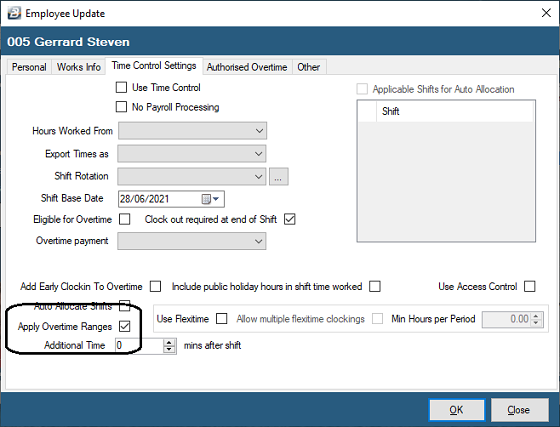
This can be done one employee at a time, to do this: •Go to the 'Edit', then 'Employee Master' menu options •Select the employee to which the overtime range applies •Go to the 'Time Control Settings' tab. •Place a tick in the checkbox 'Apply Overtime Ranges' which can be seen near the bottom of the screen as shown below:
|
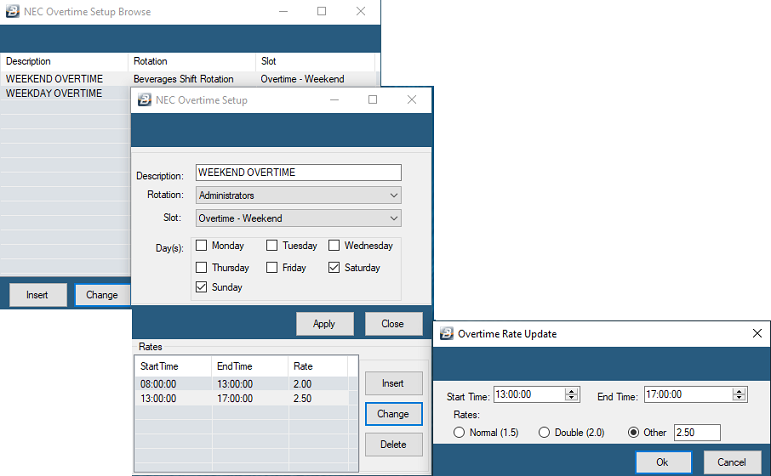
![]() Method 2 - Where there are no Minimum Hours
Method 2 - Where there are no Minimum Hours
Under this method no minimum hours are set before overtime is earned.
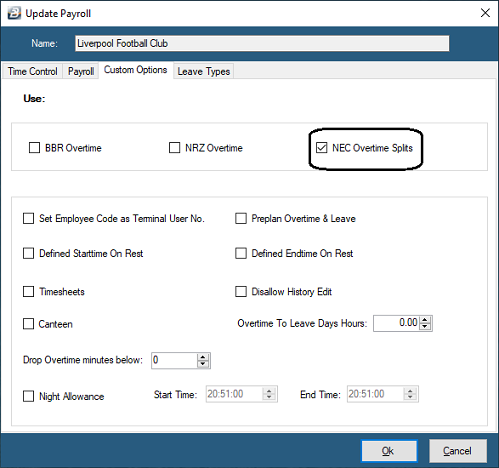
To set this up: •Go to the 'Setup', 'Defaults' and then the 'Attendance' menu options •Select the 'Custom Options' tab •Place a tick against 'NEC Overtime Splits' •Press 'OK'
Once this is done we then setup the Overtime Ranges under the Edit menu, to do this: Step 1 •Go to the 'Edit', then 'Overtime Ranges' menu options •Press 'Insert' to setup the type of overtime. •Enter the 'Description' of the overtime •Use the Dropdown menu to select the type of 'Rotation' •Use the Dropdown menu to select the type of 'Slot' •Tick the days of the week that this overtime applies to •Press 'Apply' to save the entries made
Step 2 Once the 'Apply' button has been pressed the 'Insert' button in the lower part of the form becomes active. Use this bottom section to setup the rates that apply to the overtime: •Press 'Insert' •Enter the 'Start Time' and the 'End Time' for the overtime •Use the radio button to select the 'Rates' that applies to the overtime range. •Press 'OK' to save the Overtime Rate
Step 3 Now that the overtime ranges have been setup, they now need to be allocated to the employees to which they apply.
This can be done for a group of employees, in bulk, to do this: •Go to the 'Edit', then 'Bulk Employee Master Update' menu options •Select the 'Apply Overtime Range' checkbox, then •Select 'Yes' under the 'Field Value' •Select the employees to which the overtime range applies by pressing the 'Employees' button •Press 'OK' to save the entry •A confirmation message then displays that the entry has been made, •Press 'OK' to confirm, then •Press the 'Close' button to close the screen and move to the next task.
This can be done one employee at a time, to do this: •Go to the 'Edit', then 'Employee Master' menu options •Select the employee to which the overtime range applies •Go to the 'Time Control Settings' tab. •Place a tick in the checkbox 'Apply Overtime Ranges' which can be seen near the bottom of the screen as shown below:
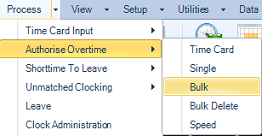
Step 4 Ensure that the overtime hours worked are authorized. There are a number of ways of authorizing overtime. The 'Bulk' option is the quickest and most convenient method, but it can also be done using the time card, one employee at a time or by using the speed input method. These are the menu options:
•See the Authorizing Overtime section to see how the different methods operate.
Step 5 Run the Calculation Routine. Running the Calculation Routine is a standard procedure before extracting reports and exporting data. |
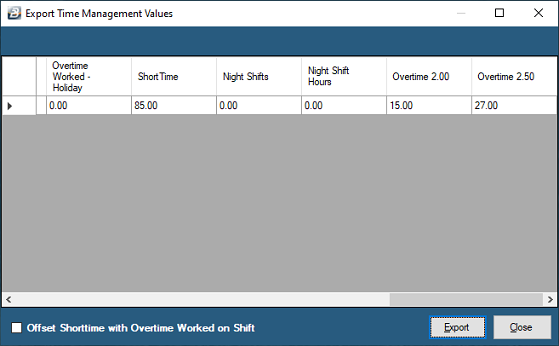
![]() Export Overtime to Spreadsheet or textfile
Export Overtime to Spreadsheet or textfile
Those clients that do not have the Belina Payroll Module can export overtime hours worked to spreadsheet, to do this: •Go to the 'Utilities', 'Export Data', then 'Time Clocking Records' menu options •A range selection screen displays •Select the employees, or range of employees, for which overtime hours are to be exported •A screen displays the selection. •Scroll across to the right to see the overtime values coming through.
•Check the details that are displayed to satisfy yourself that the correct selections have been made and that the information is as expected •When satisfied press the 'Export' button. •The following screen displays:
|

![]() Export Overtime from the Time Control to Payroll Modules
Export Overtime from the Time Control to Payroll Modules
If you have the Belina Payroll Module times can be transferred directly without having to do an export. This is covered in the Payroll manual under Further Topics - Time Control Data. |