Global defaults are setup to avoid having to enter setup details every time a procedure is undertaken. Go set the Global Defaults go to the 'Setup', then 'Global Defaults' menu options:
Currency
|
Convert the payroll to use another currency
|
Emailing
|
Enable the sending of emails, including payslips,
|
Employee Master
|
Default values to come through in the Employee Masterfile
|
Leave
|
Initialization of sick and other leave accumulations
|
Processing
|
Display order that employees or earnings/ deductions will be displayed
|
Reports
|
Setup logo and fonts, and whether reports will be printed to a laser or dot matrix printer
|
Security
|
Lock the payroll after selected processes
|
Communications
|
Setup various types of internal notifications
|
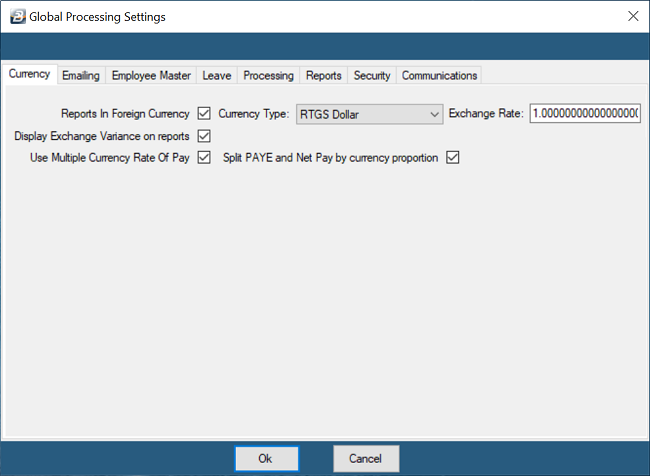
 Currency Tab Currency Tab
The base currency used by a payroll is set when the payroll is first created but can be changed using Global Defaults or under 'Payroll Maintenance'. It is possible to use multiple currencies. Any one employee can be paid in one or more foreign currencies.
Reports in Foreign Currency
|
Tick if reports are to be reported in a currency that is not the base currency. If the base currency is the same as the reporting currency then no tick is required.
|
Currency Type
|
If reports are to be in another currency then select the currency required.
|
Exchange Rate
|
This field displays the exchange rate entered under the 'Setup', 'Currency' menu options.
|
Use Multiple Currency Rate of Pay
|
Tick this option to enable the Employee Master file to record the Basic Pay amounts in each of the currencies being paid to an employee.
|
Split PAYE and Net Pay by currency proportion
|
This facility splits the PAYE amount in proportion to the Gross Income earned in different currencies. All multi-currency payrolls should have USD as the base currency. Any earnings in another currency is converted to USD values using the exchange rates that that been setup under 'Currencies'. When the Tax Calculation is performed the total tax is calculated in USD. This amount is split in proportion to how much was earned in each of the currencies. Tax on USD earnings is paid in USD. Tax on each of the other currency earnings is paid in each of those currencies, converted back at the rate applied earlier.
|
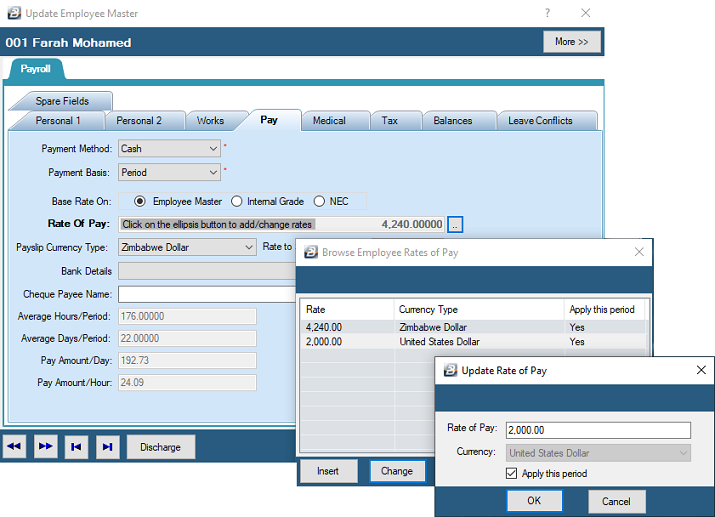
Basic and Net Pay in Foreign Currency
If some employees are being paid in foreign currencies and others in Zimbabwe Dollars it is logical to have these employees put into separate payrolls. This would simplify the payroll processing and setup. The reports from both payrolls could be converted into one currency.
Note: 'Use Multiple Currency Rate of Pay' should be ticked first if the payroll is to be used to pay in Foreign Currency. Notice that when this is done that the Employee Master Rate of Pay field becomes greyed out and requires the use of the Elipsis button to enter the rates of pay in each of the currencies involved.
|
Emailing
Setup your organizational email information to enable the sending of emails, including payslips, from the payroll.

Use Microsoft Outlook for emailing
|
Tick this checkbox if Microsoft Outlook is to be used as your emailing client. Notice that when this is ticked there less field capture required since it is assumed that the Microsoft Outlook emailing has been configured.
|
Apply MS Outlook IRM
|
Information Rights Management (IRM) - allows users that have set IRM in Outlook to specify access permissions to email messages. It prevents sensitive information from being read, altered, forwarded or copied by unauthorized people.
|
Sender Email
|
Enter the email address that will be used for the sending of email communications from the payroll, including payslips and P6's.
|
Obtain from your system administrator the following details:
|
Outgoing Mail Server (SMTP)
|
Enter the IP address of the mail server
|
Username
|
Enter the Username for email access, this may differ from the normal email login
|
Password
|
Enter the server password
|
Use an encrypted connection (SSL)
|
Tick to Use an encrypted connection
|
Server Port Number
|
Enter the Server Port Number
|
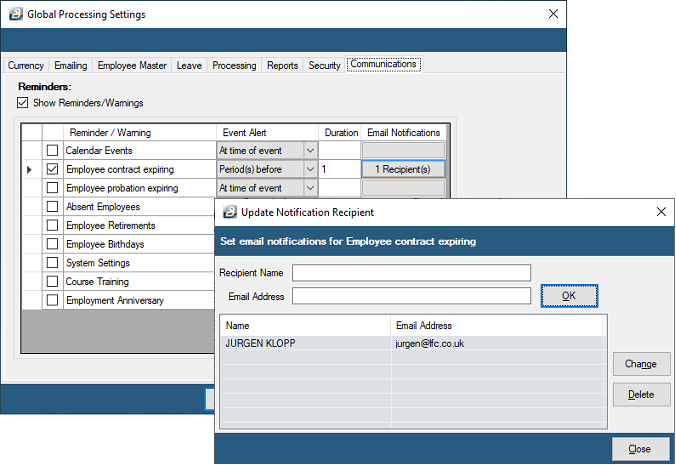
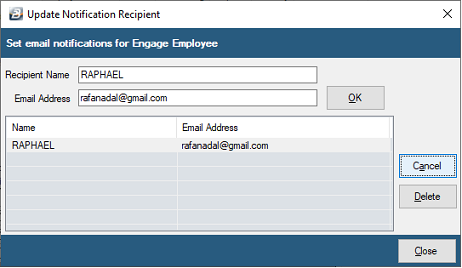
Automatic Emailing of Notifications
|
Tick the checkbox to allow notifications for the type of incident described in the table. Click in 'Recipients' box and the following screen appears. Enter the Recipient name and email address for each type of notification.
|
Use Social Security No. as default Payslip Password
|
You can select whether to use the NSSA number of each employee as the payslip password. This is relatively safe since it would likely only be known by the employee, and considering that the payslips are being sent to the employee's personal email address that would have access protections. The NSSA number protection is useful if the email is not private or the payslip has been downloaded to the computer and may be visible by another person.
If this is not selected the default password will default to Employee Code.
|
'Use 'Microsoft Outlook for emailing'
Check this option if you use Microsoft Outlook as your emailing system. Once this check-box is checked emails will automatically be routed through Outlook with no further setup required.
If the check-box is not checked then enter the email account settings for your emailing system.
If your Outlook has IRM settings tick 'Apply MS Outlook Information Rights Management (IRM)' this utility allows Belina to interact with Outlook that has IRM activated. IRM is a security feature of Microsoft Outlook that allows you to specify access permissions.
Separate Email address
Do this by setting the :
•'Sender Email' address, •'Outgoing Mail Server (SMTP)', then •'Username' and 'Password' •tick 'Use an encrypted connection (SSL)' •set your 'Server Port Number' •Use Social can use the Security No. (NSSA number) as default Payslip Password. If this is not done then the default will defer to the Employee Code of each employee, unless a password has been setup in each Employee Master Record.
'Edit Email Message'
When emails are sent Belina includes a default message which can be changed to suit your own requirements. To do this:
•Select your 'Report' type from the dropdown menu •Enter the email 'Subject' text that will be inserted in the header line of the email. This can be standing message, or changed as often as necessary. •Enter the 'Message' that will be included in the body of the email. This can be standing message, or changed as often as necessary. •Press 'OK' to save the changes 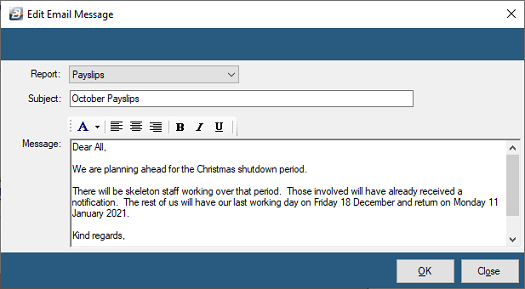
|
Employee Master Defaults
Enter settings and values that will come through automatically onto the Employee Master screen when setting up a new employee.
|
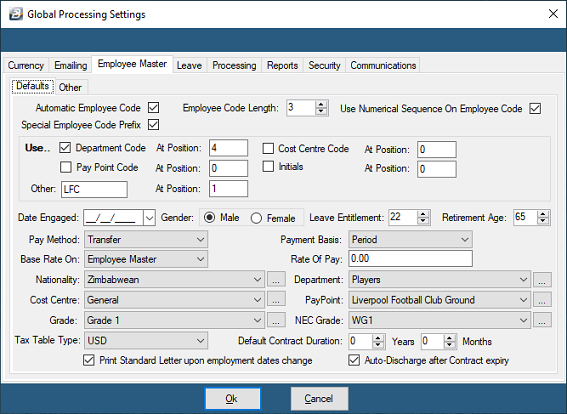
Automatic Employee Code
|
Tick to have the system automatically generate the next sequential employee code for new employees.
|
Employee Code Length
|
Accept, or change, the default Employee Code format from the number of digits specified
|
Use Numerical sequence on Employee Code
|
The employee code field is an alpha numeric field, not a number, hence codes 1, 11 and 111 would be put together. Place a tick in this checkbox to have the numbers shown in their correct numerical order.
|
Special Employee Code Prefix
|
Ticking this checkbox activates the prefix option in the section below it. Some organizations have a prefix to the employee code which could be an abbreviation for some special identifier that is unique to your organization. Often organizations use the Department, Cost Centre or Paypoint eg. HRE001 or BYO001 as shown below.
|
Use Department Code
|
Tick to have the Department code as the prefix, suffix or at a specified position within the Employee Code
|
Use Cost Centre Code
|
Tick to have the Cost Centre code as the prefix, suffix or at a specified position within the Employee Code
|
Use Paypoint Code
|
Tick to have the Paypoint code as the prefix, suffix or at a specified position within the Employee Code
|
Use Initiials
|
Tick to have the Initials as the prefix, suffix or at a specified position within the Employee Code
|
Use Other
|
Tick to have a specified set of characters as the prefix, suffix or at a specified position within the Employee Code eg. LFC for Liverpool Football Club distinguishing employees from employees in another payroll.
|
Date Engaged
|
Enter a default date of engagement only if there are a number of employees being engaged at that date. Leave blank to have the system date entered.
|
Gender
|
Select a default gender - Male or Female
|
Leave Entitlement
|
Enter the default annual leave day entitlement
|
Pay Method
|
Select the default method of paying staff e.g. cash, cheque or transfer
|
Payment basis
|
Select the default payment basis e.g. weekly, fortnightly or monthly
|
Base Rate On
|
Are employees paid based on the Basic pay as entered in the Employee Master, Internal grade rate or NEC grade rate
|
Rate of Pay
|
Enter a value if there are a number of employees being engaged on the same rate of pay
|
Nationality
|
Select the default nationality e.g. Zimbabwean
|
Department
|
Lookup the default Department for new employees being engaged.
|
Cost Centre
|
Lookup the default Cost Centre for new employees being engaged.
|
Pay Point
|
Lookup the default Paypoint for new employees being engaged.
|
Grade
|
Lookup the default Grade for new employees being engaged.
|
NEC Grade
|
Lookup the default NEC grade for new employees being engaged.
|
Tax Table Type
|
Select the Tax Table Type from the dropdown menu. Select USD if the payroll is USD or multi-currency. Select 'Default' if the payroll is ZiG.

|
Special Employee Code Prefix
|
Tick whether the Employee Code should include information about the employee and where in the code it should be positioned
|
|
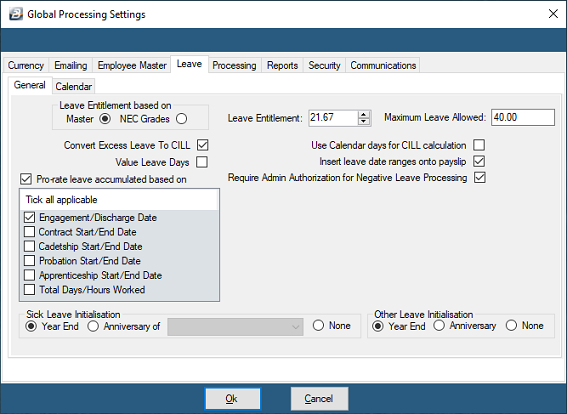
Leave
Calendar or Working Days? - Before processing leave a decision has to be made whether the organization is to use calendar or working days for the leave entitlement and subsequent leave processing. We recommend that working days, rather than calendar days, be applied. The reasons being that rules governing the leave days are easier to understand and apply. Belina PayrollHR can use the daily rate for an employee to value the leave days taken.
The Labour Act specifies that employees should receive 30 calendar days leave per annum (slightly less than the average number of days per month - 365/12 = 30.42). Giving an employee the average number of working days leave in a month is slightly more favourable for the employee and is therefore an acceptable way of working out leave entitlement.
The default leave entitlement entered under Global Defaults will be the leave entitlement automatically applied to each new employee's masterfile data. It will also set the foundation of whether calendar, or working days, are being used in the payroll.
Master or NEC Grades
|
Base the annual leave entitlement on what was entered in the employee masterfile or base on the NEC grade for the employee.
|
Leave Entitlement
|
Setup the payroll to take leave entitlement from the employee master or from what has been set up under NEC Grades. The Labour Act stipulates 30 working days, therefore enter the equivalent, or more, than one calendar months leave. The number of days entered comes through to each new employee master record as the default value.
|
Maximum Leave Allowed
|
Limits the accumulation of leave. Once this barrier is reached the employee will lose leave.
|
Convert Excess Leave to CILL
|
Click in the check-box to enable the conversion of excess leave into a payment for leave days instead of the employee losing the value of the leave accrued.
|
Value Leave Days
|
When leave transactions are processed the value of the leave days is stated and included on the payslip and reports. This means that the basic pay is apportioned between basic and leave. This clearly identifies the value of leave days taken for the employee and employer but can confuse employees who see a lower basic pay.
|
Use Calendar days for CILL calculation
|
This is a parameter included for NRZ employees. CILL days will be valued at the current daily rate based on the number of days in the period. This true so long as the number of days does not exceed the the number of days left in the current period. Any excess will be valued at the next period's daily rate based on the number of days in that period.
|
Insert Leave date ranges onto payslip
|
Tick to have leave start and end dates recorded on the payslip.
|
Pro-Rate leave accumulated based on
|
If employment begins or ends in the middle of a period then a full accrual of leave for the period may not be appropriate. Select one of the criteria to be the default method of calculating the proportion. For all the options, except the last one, the calculation is based on calendar days.
|
Sick Leave Initialization
|
Initialize the counting of sick leave days at the beginning of the year, on the anniversary of employment, or not at all. Initializing at year end is the easiest to understand, but legally the anniversary of engagement is correct.
|
Other Leave Initialization
|
Initialize the counting of other leave days at the beginning of the year, on the anniversary of employment, or not at all. Initializing at year end is the easiest to understand, but legally the anniversary of engagement is correct.
|
|
Processing
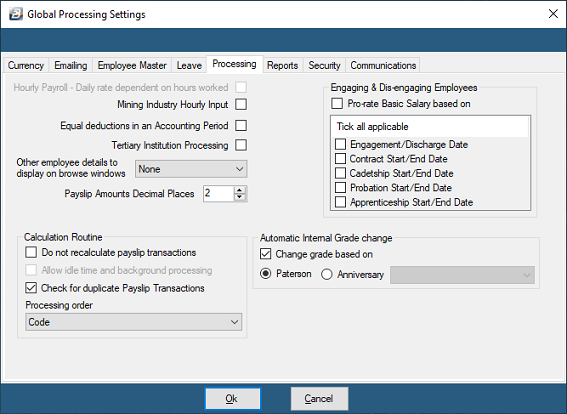
Mining Industry Hourly Input
|
Custom feature specific to an individual client.
|
Equal deductions in an Accounting Period
|
It is possible to have Medical Aid or Pension look at the number of payroll periods within the accounting period rather than working out an average. There may be 4 or 5 weekly periods in a month. It is now possible to apply the specific number of periods rather than have an average of say 4.33.
|
Tertiary Institution Processing
|
Check this field to enable the entry of Academic or Non-Academic staff under the 'Works' Tab in the Employee Master
|
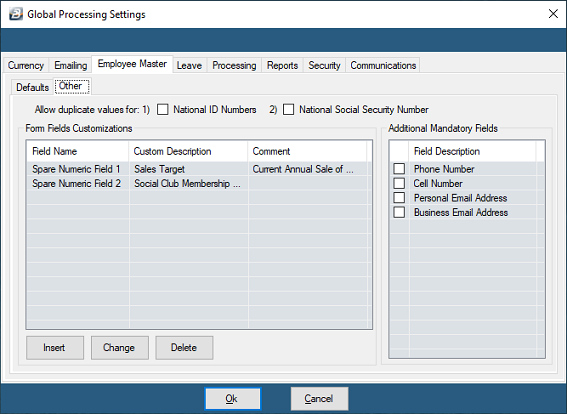
Other employee details to display on browse windows
|
The selected details come through at the top of the form when an employee is selected. Eg. alongside the person's name could be 'Occupation'.
|
Do not recalculate payslip transactions
|
This is normally a feature used by Belina Support staff only. Some functions are only available only after a calculation routine has been done. If changes to the payroll have been done that do not affect transaction totals and the tax then a calculation routine is NOT required. If running the calculation routine will cause inconvenience then it can be bypassed by ticking this option.
|
Check for duplicate Payslip Transactions
|
When the Calculation Routine is run duplicate transactions on a individual's Payslip Input are highlighted in red to draw attention to the duplication. This does not prevent further processing and the duplication can remain unless changed by the user.
|
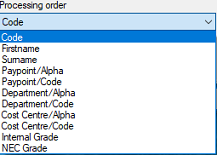
Processing Order
|
When the Calculation Routine is run in the specified order payslips are generated and a serial numbered allocated to each payslip in that order. If this is a requirement for your payroll contact Belina support who will be able to avail you of a payslip format with a serial number field.
|
Automatic Internal Grade Change
|
Tick the checkbox if Internal grades are to automatically adjust according to Paterson rules or on the anniversary of engagement.
|
Paterson
|
Move the radio button to 'Paterson' if Paterson Grades are being used. The hyperlink takes you to detailed Paterson setup notes.
|
Anniversary
|
Grade changes can be made automatically based on years service for various groups of employee. See topic 'Auto Increment - Years Service'
|
|
Reports
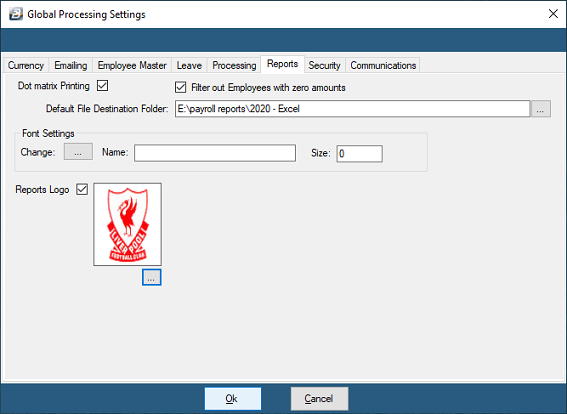
Dot Matrix Printing
|
Click on the check-box to enter a tick and activate dot matrix printing. Belina HR reports include graphical fonts and images that can be printed easily on laser and inkjet printers. Dot matrix printers struggle to print these reports. Place a tick under 'Dot Matrix Printing' to print reports specifically designed for dot matrix printers and enjoy simple, but fast, report layouts.
|
Filter out Employees with zero amounts
|
Click on the check-box to enter a tick and activate a filter to suppress the printing of employees that do not have transactions
|
Font Settings
|
Press the ellipsis button to select the font, size and style that you would prefer for reports
|
Reports Logo
|
Click on the check-box to enter a tick and activate the ellipsis button to browse for the the Reports Logo file for inclusion in Belina HR reports
|
|
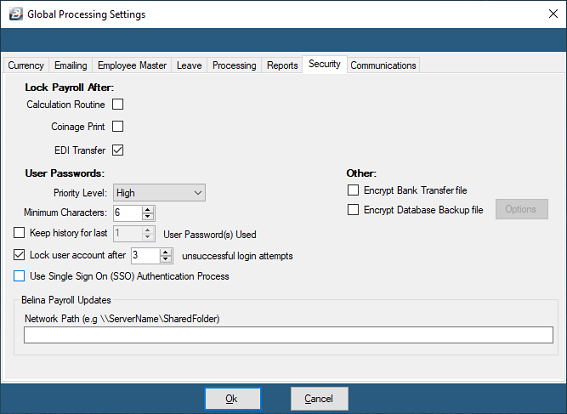
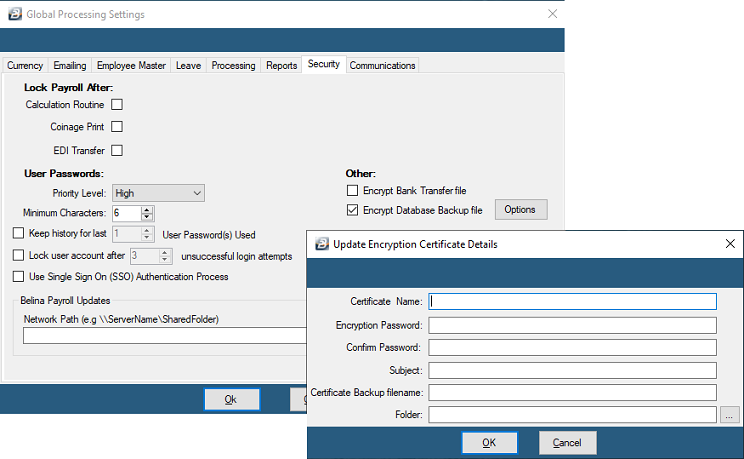
Security
Security measures have been included to enable the locking of a payroll after completion of one of the above procedures. This works in conjunction with the 'Lock/ Unlock' menu option under 'Utilities'.
'Lock Payroll After':
To Lock the payroll from further processing:

Click to play
Lock Payroll After
|
It is possible to Lock the payroll at specific points in payroll the processing cycle to prevent possible abuse. The points of locking are:
- Once the Calculation Routine has been run a specified number of times
- Once the Coinage Report has been printed
- Once the EDI bank transfer routine has been exported.
|
'User Passwords'
|
'Priority Level' - Belina PayrollHR allows the User to determine the 'Priority Level', or Password Strength, to 'Low', 'Medium' or 'High'. If 'High' is selected and a User attempts to enter a password that is weaker than it should be then the system will not accept it. A strong password is one that includes a combination of upper and lower case alphabetic characters, numbers and symbols with an overall length of more than 8 characters.
|
''Minimum Characters'
|
Set the absolute minimum number of characters that a password should have.
|
'Keep History for Last'
|
To prevent Users from re-using old passwords and possibly undermining security a record can be maintained of a specified number of used passwords that cannot be re-used.
|
'Lock user account after'
|
If someone tries to access an account using an incorrect password it may indicate that an unauthorized person is attempting to access the payroll. To prevent someone gaining access by trying various password combinations a limit to the number of attempts can be set.
|
Use Single Sign On (SSO) Authentication Process
|
This allows users to use their Window authentication credentials to log in automatically into Belina PayrollHR. If this checkbox is ticked then the payroll will look automatically for the Windows login details.
|
Encrypt Bank Transfer file
|
Use the checkbox to have the Bank Transfer File encrypted. Each service provider (bank) would need to have encryption and decryption keys. An unencrypted file should be protected from unauthorized access since it can be opened and read.
|
Encrypt Database Backup file
|
Use the checkbox to have the backup file encrypted. This prevents a person accessing data from the backup file.
|
- Certificate Name
|
Large corporates often have their own Encryption Certificates that they purchase from Certificate suppliers. Enter the name of the supplier.
|
- Encryption Password
|
Enter the encryption password that is required to open the encrypted file. Care should be taken with the password set since without this password there is no access to the file.
|
- Confirm Password
|
Confirm the encryption password. You are asked to re-enter the password to ensure that it was entered correctly in the first instance.
|
- Subject
|
Describe the data included in the backup
|
- Certificate Backup Filename
|
This is the filename of the Certificate
|
- Folder
|
Use the elipsis button to lookup the folder in which the encryption certificate is located.
|
Belina Payroll Updates
|
If you are running the payroll on a server then enter the network location of any program updates. This will enable the system to check whether an update is available. If this is the case then a notification will display when they log in allowing the user to update the software on the local computer.
|
|
|