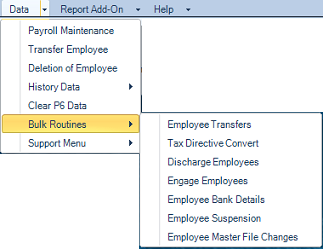
Bulk Routines is a menu option under the 'Data' menu:
The options allow the making of changes to groups of employees in one step. It is important to do a backup of your payroll before proceeding with any of these menu options.
We advise that an interim backup is taken before doing any of the following process. This precaution will enable the system to be put back into the position it was in before undertaking the procedure. This would be done by restoring the backup.
Use this routine to transfer employees from payroll to another.
Before doing the transfer ensure that: - you have done a backup of both the sending and receiving payrolls. - the Employee Codes for those being transferred are not used in the receiving payroll. - the Transaction Codes in each payroll are identical (The transaction descriptions my differ but the Transaction Type and Transaction Code number should be the same). - the payroll types are the same. Example you can transfer employees from one weekly payroll to another weekly payroll, but not from a weekly to a monthly payroll. - the payroll period setups are the same. Example, if there is a bonus period in the one payroll it should also be in the other payroll for current, past and future periods. For loans extending into the future it is important to ensure that the current and future periods are the same. - both payrolls are in the same period. - the payrolls need to be in the same currency.
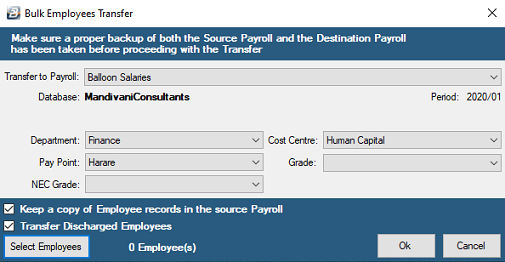
Use this menu option to transfer a group of employees from one payroll to another. To do this: - Go to the 'Data', 'Bulk Routines', then 'Employee Transfers' menu options. - A screen displays, use the dropdown menu to select the destination payroll into which employees will be transferred - Select, if appropriate, which Department, Cost Centre, Pay Point, Grade or NEC Grade that the employees will have in the new payroll - Use the checkbox to 'Keep a copy of Employee records in the source Payroll'. This means that any reports subsequently run in the source payroll will still have the same data and will not be affected by the transfer of the employee/s. If the data is moved to the new payroll then re-running reports will not produce the same result. The history transactions for the employee are taken with the employee to the new payroll. This is required especially for FDS tax calculations. Care should be taken to when consolidating the two payrolls because there would be duplication of historical data where records were kept in the source payroll.
When the transfer is done the employee is automatically discharged from the payroll.
- Use the 'Transfer Discharged Employees' checkbox is especially useful, for contract workers who may be re-activated seasonally. This gives the receiving payroll the ability to report on historic data containing the discharged employees. - Use the 'Select Employees' button to select employees or a range of employees to be transferred.
|
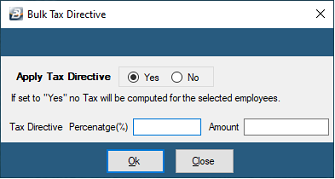
Use this menu option to put a number of employees on a Tax Directive. This means that the automatic calculation of tax is suspended and the PAYE will be a set percentage of income, a set amount or nothing at all. To do this: - Go to the 'Data', 'Bulk Routines', then 'Tax Directive Convert' menu options. - To apply a Tax Directive move the radio button to 'Yes'. This will suspend the Calculation Routine and no tax will be computed, instead either the 'Percentage %' or 'Amount' entered will be entered as the PAYE amount on the employee's payslips. - Press OK - A range selection screen then appears to enable the directive to be applied to selected employees or a range of employees.
|
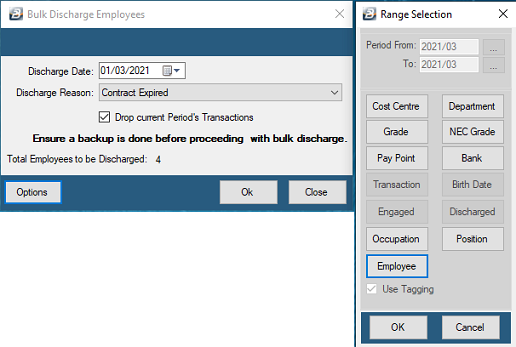
Use this menu option to discharge a number of employees at once. This is especially useful with contract workers whose contracts may come to an end at the same time. To do this: - Go to the 'Data', 'Bulk Routines', then 'Discharge Employees' menu options. - Enter a 'Discharge Date' - Use the dropdown menu to select one of the standard reasons for discharge. - Tick the checkbox to 'Drop current Period's Transactions if this is required. - Use the 'Options' button to select employees or a range of employees to be discharged.
|
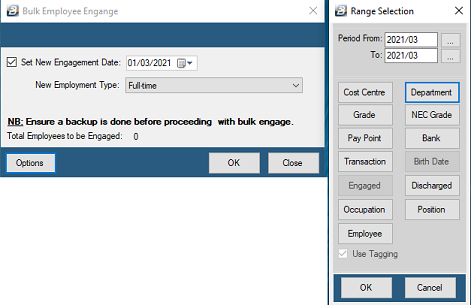
Use this menu option to re-engage a large group of employees, this can be done in one step using this bulk routine. This is especially useful with contract workers who may be re-engaged at the same time. To do this: - Go to the 'Data', 'Bulk Routines', then 'Engage Employees' menu options. - Tick the checkbox to 'Set New Engagement Date' - Use the dropdown menu to select 'New Employment Type' that will apply to the employees that are being re-engaged - Use the 'Options' button to select employees or a range of employees to be re-engaged.
|
|
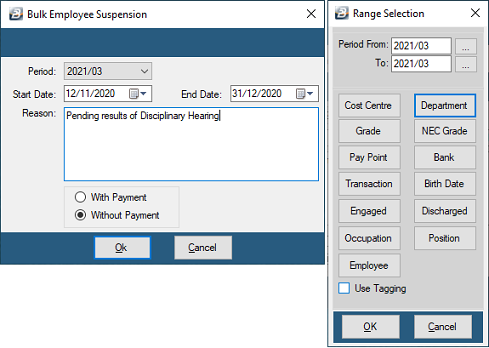
Use the 'Employee Suspension' bulk routine option to mark a group of employees as suspended, or absent. To do this: - Go to the 'Data', 'Bulk Routines', then 'Employee Suspension' menu options. - Select the Period that the suspension applies to - Select the 'Start Date' and the 'End Date' to be entered onto each Employee Master record - Enter the 'Reason' to be entered onto each Employee Master record - Press OK - A range selection screen then appears to enable the directive to be applied to selected employees or a range of employees. - Notice the shorttime records recorded for each employee affected.
|
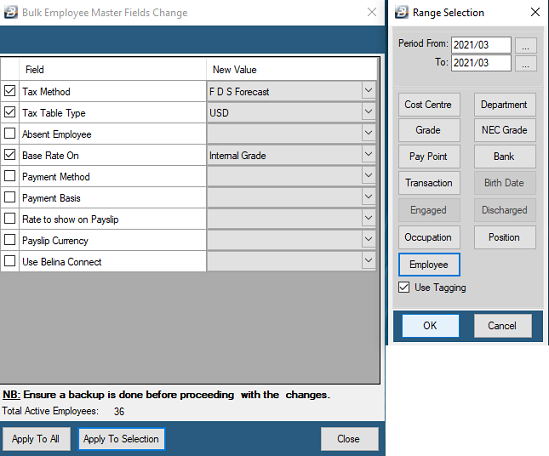
Use the 'Employee Masterfile Changes' to change the entries of specified fields in the Employee Master records of selected employees. To do this: - Go to the 'Data', 'Bulk Routines', then 'Employee Masterfile Changes' menu options. - Tick one, or more checkboxes for the field/s you would like to change in the employee master record of selected employees. - As each field selection has been done use the dropdown menu on the right hand side of the screen to select the change required. - When complete select 'Apply to All' or 'Apply to Selection' in which case a range selection window will appear to enable you to select particular employees, or a range of employees.
|