To transfer an employee from one payroll to another, you'll need to follow a series of steps to ensure a smooth transition. This process involves verifying that both the source and target payrolls are compatible in terms of transaction codes, currency, and pay period.
Employee transfers work for both single-currency and dual-currency payrolls.
We advise that an interim backup is taken before doing any of the following process. This precaution will ensure that the system is restored to its original state if anything goes wrong. This would be done by restoring the backup.
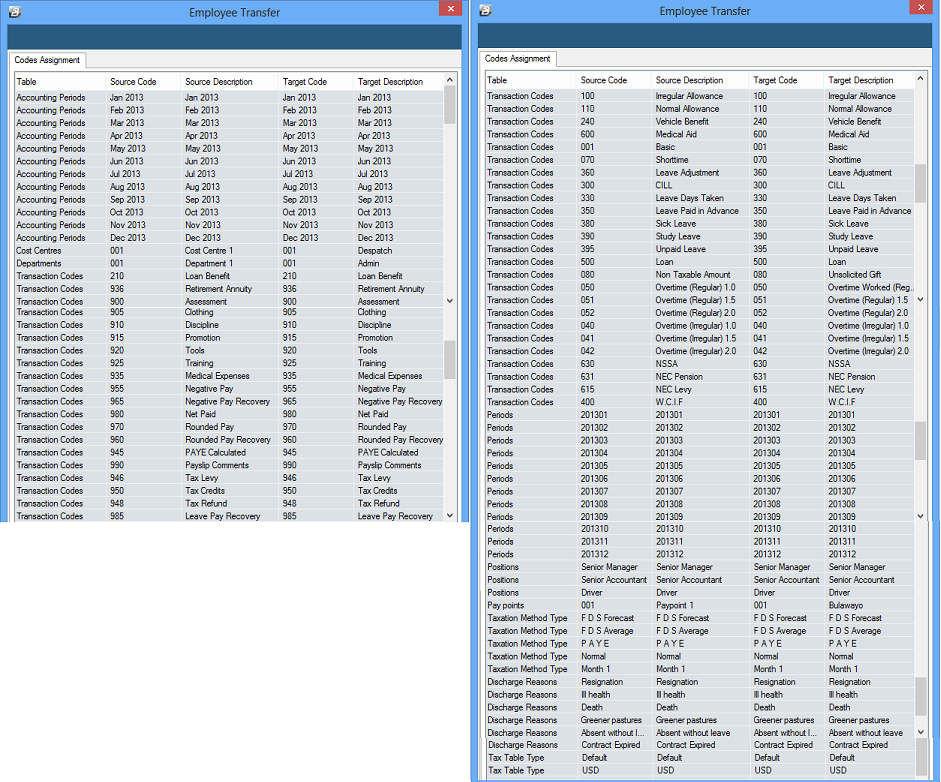
2. Ensure both payrolls use the same transaction codes.
•Go to View → Edit Menu Listing → Transaction Codes → Preview to view all transaction codes in a payroll.
•Print or export the report for easy comparison.
•Compare the lists for both the source and target payrolls.
•If a code is missing in the target payroll, you must create it. Go to Edit → Transaction codes to create it.
3. Confirm that both payrolls use the same currency.
•If both payrolls have consistently used the same currency, you can transfer employee history.
•If payrolls switched currencies, you may only transfer history for the matching periods.
•For multi-currency payrolls, verify that the exchange rates used in each period are the same. Check this by going to View → Multicurrency → Exchange Rates → Preview for each period.
4. The payrolls must be in the same period.
•To check, go to File → Open. Confirm that both payrolls have the same number of periods and the same current period.
•A weekly or fortnightly payroll cannot transfer an employee to a monthly payroll because their periods will not align.
5. 5. Ensure unique assignment of employee codes.
•Verify that the employee's existing code doesn't already exist in the target payroll system.
•If a duplicate code is found, the system will automatically modify the transferred employee's code by adding the suffix "_TRF" to it (e.g., employee code 001 becomes 001_TRF). This process is an automated solution to prevent duplicate entries and maintain unique identifiers within the system.
There are two ways to transfer an employee: a single transfer or a bulk transfer.
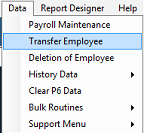
1.Go to Data → Transfer Employee.
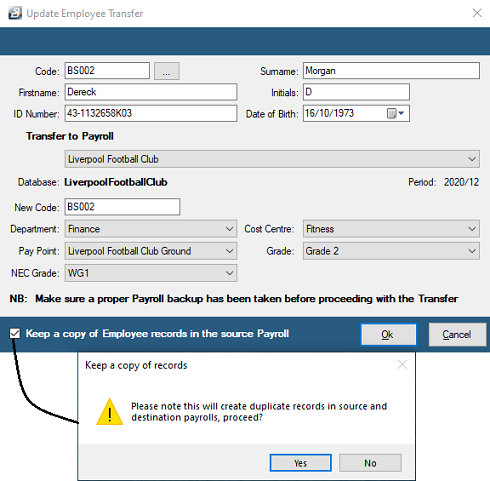
2.Use the ellipsis button next to "Code" to select the employee. 3.Choose the target payroll from the dropdown menu.
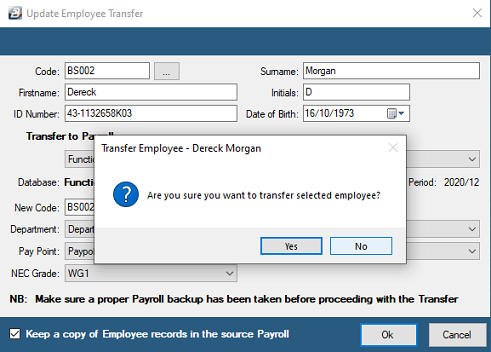
4.Allocate a unique new employee code. 5.Assign the Department, Cost Centre, Pay Point, Grade, and NEC Grade for the new payroll. Optional: Tick 'Keep a copy of Employee Records' if you want to duplicate the records in both payrolls. Keep in mind that this will produce a duplication when consolidating payrolls. 6. Click OK. When going ahead with the transfer a warning message displays asking whether you would like to continue, or not. Click Yes.
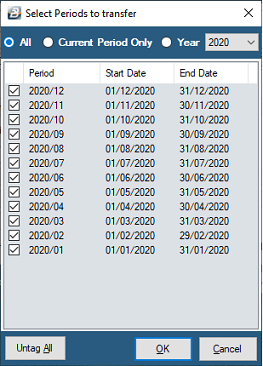
7. Select Periods to Transfer •Current Period only – transfers data for the open period. •Year – transfers data for the current financial year. •All – transfers all periods (not recommended, as historical currency changes and period inconsistencies may corrupt data).
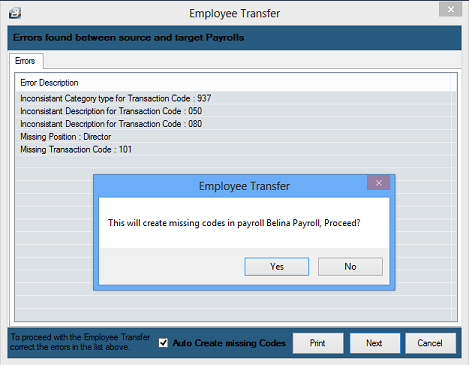
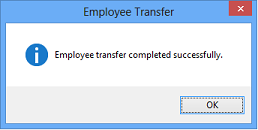
•Click OK. •If there are no errors, a message will confirm the successful transfer. 8. If errors appear, review the list and correct them. You may tick Auto-create missing codes to let the system generate missing codes.
•Click Yes to proceed. •Click Next and verify that all information (periods, currencies, codes) matches between the source and target payrolls.
•Click Finish. A message will confirm the successful transfer.
|
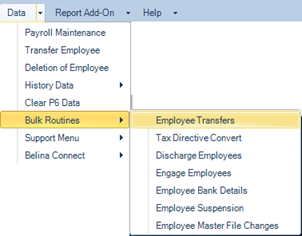
1.Go to Data → Bulk routines → Employee transfers.
2.Click Yes on the pop-up reminding you to ensure a backup has been taken.
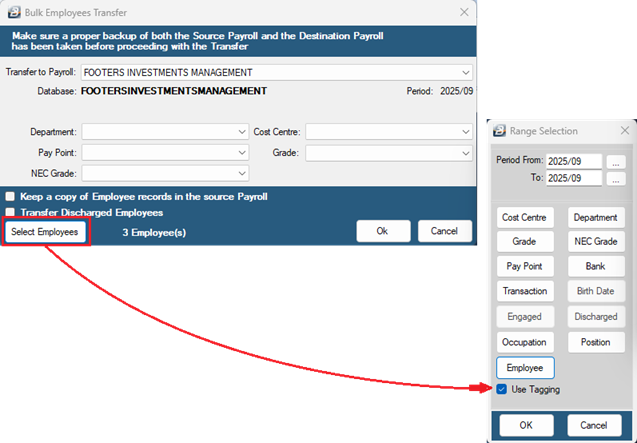
3.Select the target payroll from the drop-down. Optional fields: •Assign new Department, Cost Centre, Pay Point, Grade, NEC Grade in the target payroll. If you leave these menus plank, the system will automatically use the default settings from the current payroll. •Tick "Keep a copy of Employee records in the source payroll" if you want to duplicate records. Keep in mind that this will produce a duplication when consolidating payrolls. •Tick "Transfer discharged employees" to include inactive employees in the transfer. 4. Click Employees → tick Use Tagging to select the group of employees
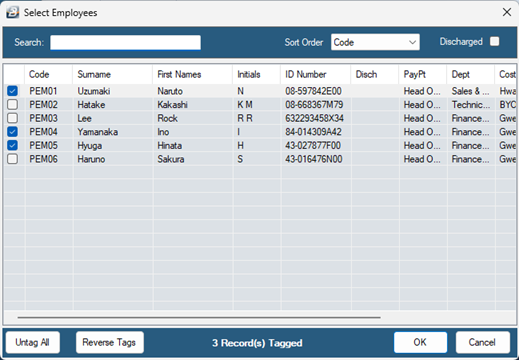
Proceed to tag employees by different criteria, for example, you may manually tag employees by selecting the 'Employee' button. Once employees have been selected click OK.
5. Click OK to proceed.
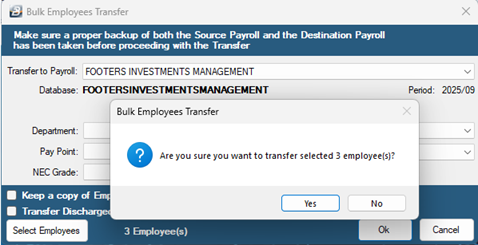
When going ahead with the transfer a warning message displays asking whether you would like to continue, or not. Click Yes.
5. Select Periods to Transfer •Current Period only – transfers data for the open period. •Year – transfers data for the current financial year. •All – transfers all periods (not recommended, as historical currency changes and period inconsistencies may corrupt data).
•Click OK. •If there are no errors, a message will confirm the successful transfer. 6. If errors appear, review the list and correct them. You may tick Auto-create missing codes to let the system generate missing codes.
•Click Next again and verify that all information (periods, currencies, codes) matches between the source and target payrolls.
•Click Finish. A message will confirm the successful transfer.
|