If the history data is not to be imported in spreadsheet or text file format the next alternative would be to process the data into the system using the traditional processing methods. This can be done y to export the data to a file or to spreadsheet then this data can be done in summary, or in detail:
Processing the history in detail means that reports can reflect data from specified ranges of period.
Step 1 - Manual edit Ensure that all Transaction Codes have been set to allow manual editing.
Step 2 - Create tax deduction codes When capturing history data we need to manually enter the actual tax calculated, by the previous payroll system, in prior periods. To do this we do not want Belina PayrollHR to compute the PAYE amount, we just want to process a manual entry reflecting the exact amount actually deducted at the time.
To do this create a PAYE and an Aids Levy code to process these manual entries, using the following:
Give these codes a descriptions that differentiate them from Code 945 - PAYE Calculated and 946 - Tax Levy. A suggestion could be 'PAYE - Manual Entry' and 'Aids Levy - Manual entry'.
Prior periods data can be processed period by period or by entering totals. In either case it is necessary to turn off the automatic tax calculation. Belina PayrollHR will not calculate the actual tax but you will enter the actual historical PAYE amounts deducted taking care to separate PAYE and Aids Levy.
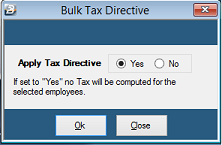
Turning off the automatic tax calculation is the same and putting the payroll onto 'Directive'.
This is done by going to the 'Data', 'Bulk Routines' and 'Tax Directive Convert' menu options. The 'Apply Tax Directive' check box tells the system not to calculate tax for all employees.
After the history data has been processed and you have moved into the current period this tick will need to be removed.
The 'Options' feature enables the User to select the range of employees you wish to add or remove from the tax directive. This is not necessary in this instance.
Step 4 - Check the current period When a payroll is created it defaults to period 01 of the year. Make sure the payroll is in the correct period for processing. The period number is displayed at the bottom of the screen, together with the period end date.
Step 5 - Move to the correct period for processing To move from one period to the next can be done by doing a period end procedure:
Step 6 - Process transactions
Step 7 - Turn off Tax Directive See comments in Step 3.
Step 8 - Remove manual edit It may also be appropriate to remove the ability to manually edit transactions on each of the Transaction Codes explained in Step 1.
Step 9 - Convert the payroll to FDS Select the 'Data', then 'Bulk Routines, then 'Tax Method Convert' menu options and select the preferred tax method. Ensure that employees engaged within the tax year remain on 'PAYE' since they are not eligible to have their tax computed on the FDS system.
Step 10 - Process the current (live) period |
