The Administrator can determine which application types will be available to employees. The Administator has access to the 'Admin' menu options, that includes the 'Settings' option . If for example, company policy does not allow for loans or advances then these application types can be suppressed and not displayed.
Employees may make various types of application, including:
Apply for an advance |
|
Apply for various types of leave |
|
Apply for various types of loan |
|
Request or claim overtime hours |
|
Ability to update specified fields in the employee's own Employee Master Record |
|
Make suggestions related to a number of business areas, including business opportunities, health and safety, staff welfare and suspicious activities |
|
Submit timesheets |
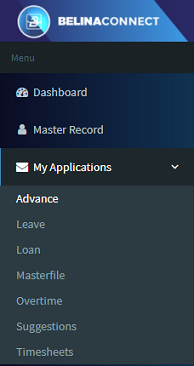
Applications can be made using the menu options under 'My Applications' on the left hand side of the screen. Alternatively applications can be accessed using the tiles on the Dashboard in the 'My Applications' section.
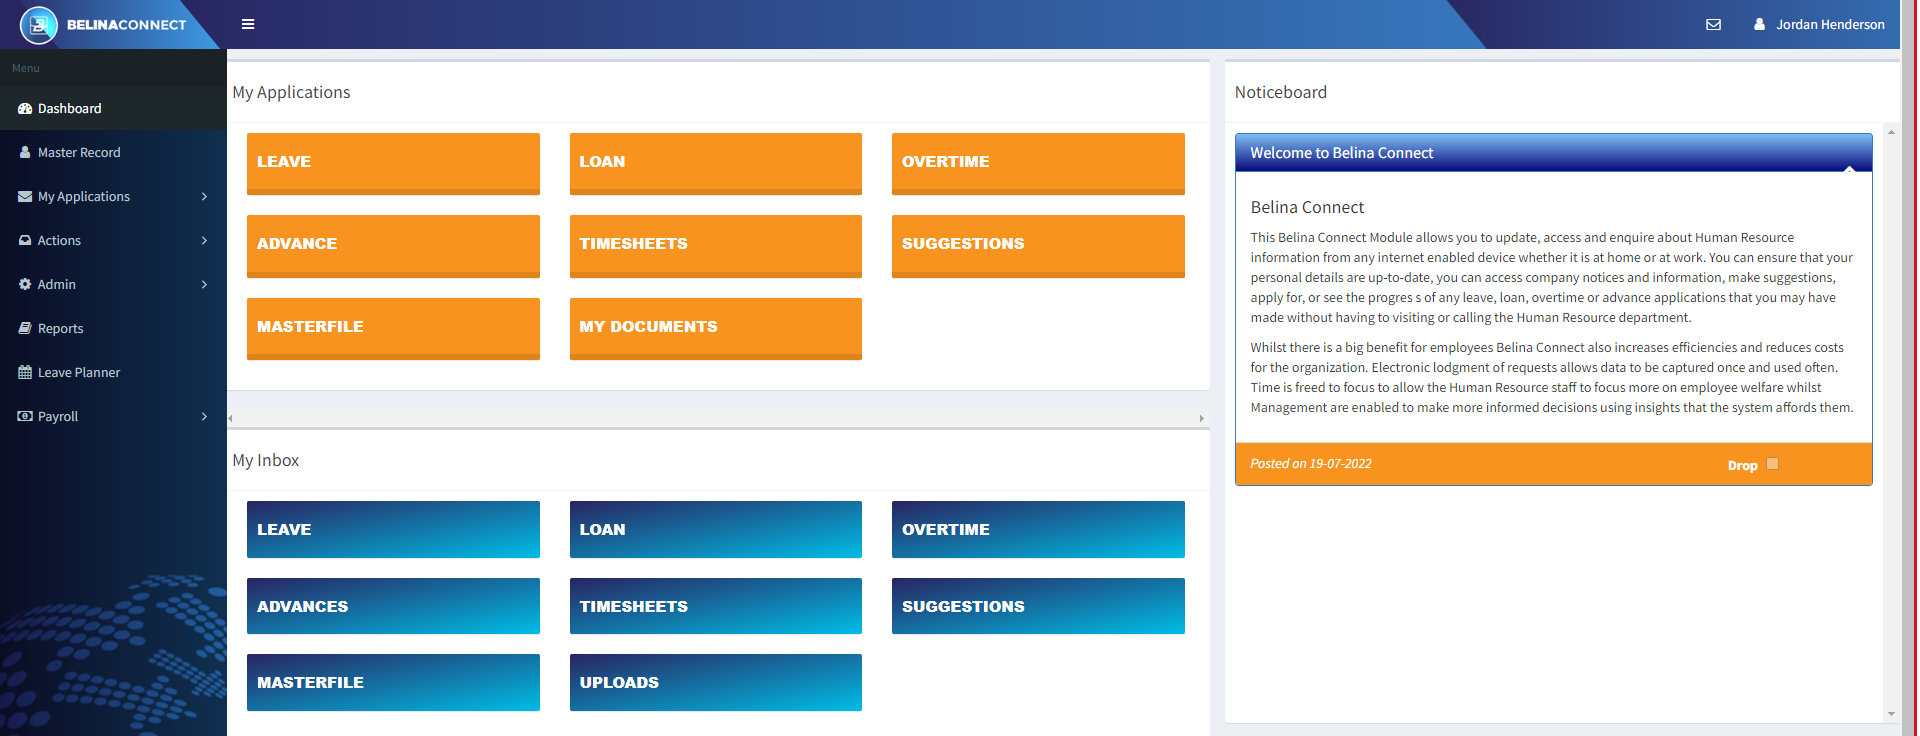
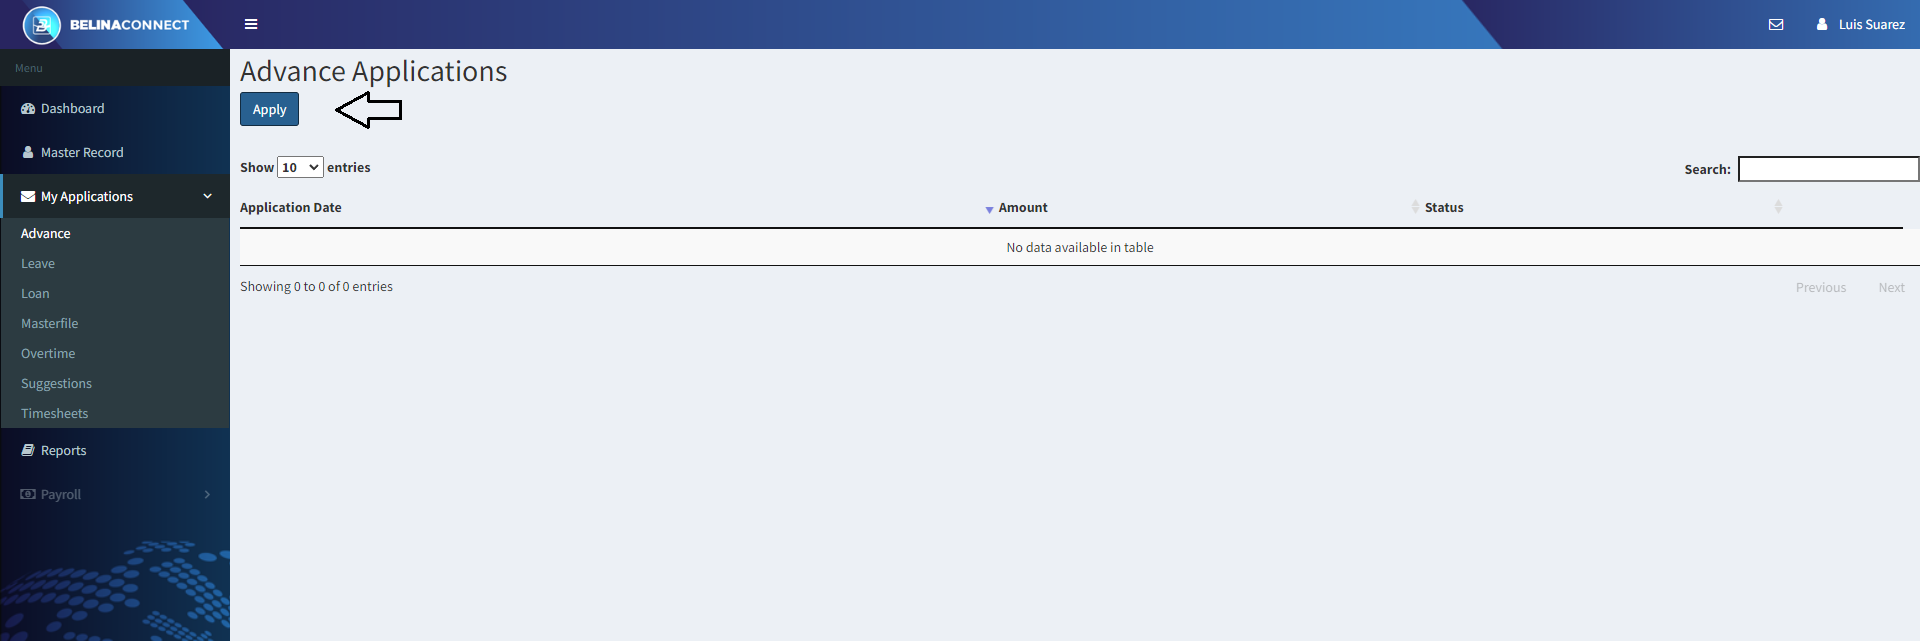
Applications of various types can be made using the tiles under the 'My Applications' section of the Dashboard. To make an application, view or cancel an application use the appropriate tile to access the transaction.
|
For an employee to apply for an Advance: - Select the Orange coloured tile 'Advance', or - Go to the 'My Applications' section of the menu displayed on the left hand side of the screen, then select 'Advance' - The 'Advance Applications' list screen is then displayed showing current and prior applications. - Press 'Apply' to apply for an Advance. - Enter the 'Amount' required - Enter a 'Reason' explaining why the advance is required. - It is optional to attach a supporting document/s. Click 'Choose file' to attach a supporting document. The system takes you to the browser that enables select the file from a folder. Press the '+' field to add another document. - Press 'Submit' to send the Application to the first person that has been setup on the Approval Path. - The application is then added to the list of applications on the screen.
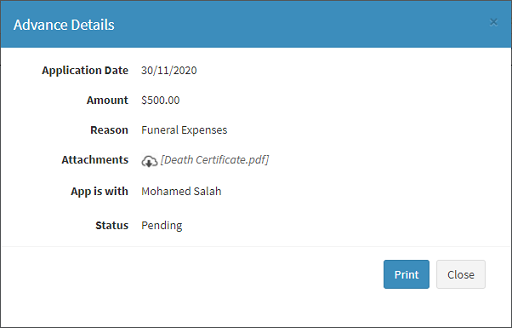
'View Details' It is possible to check an application and/or track its progress by clicking on the 'View Details' (Eye) icon on the right hand side of the listed application. In the example below the Application is with Mohamed Salah who is the first person in the Approval Path. When the Application is finally approved then the 'Status' on the 'Advance Applications' screen, above, will change from 'Pending' to 'Approved' or 'Rejected'.
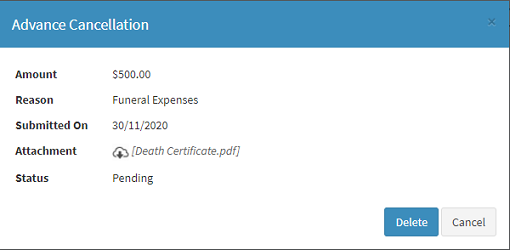
'Cancel' It is possible to Cancel, or withdraw, an application. The application remains on the list of applications with the changed Status of 'Cancelled'. The application is also removed from further actioning.
|
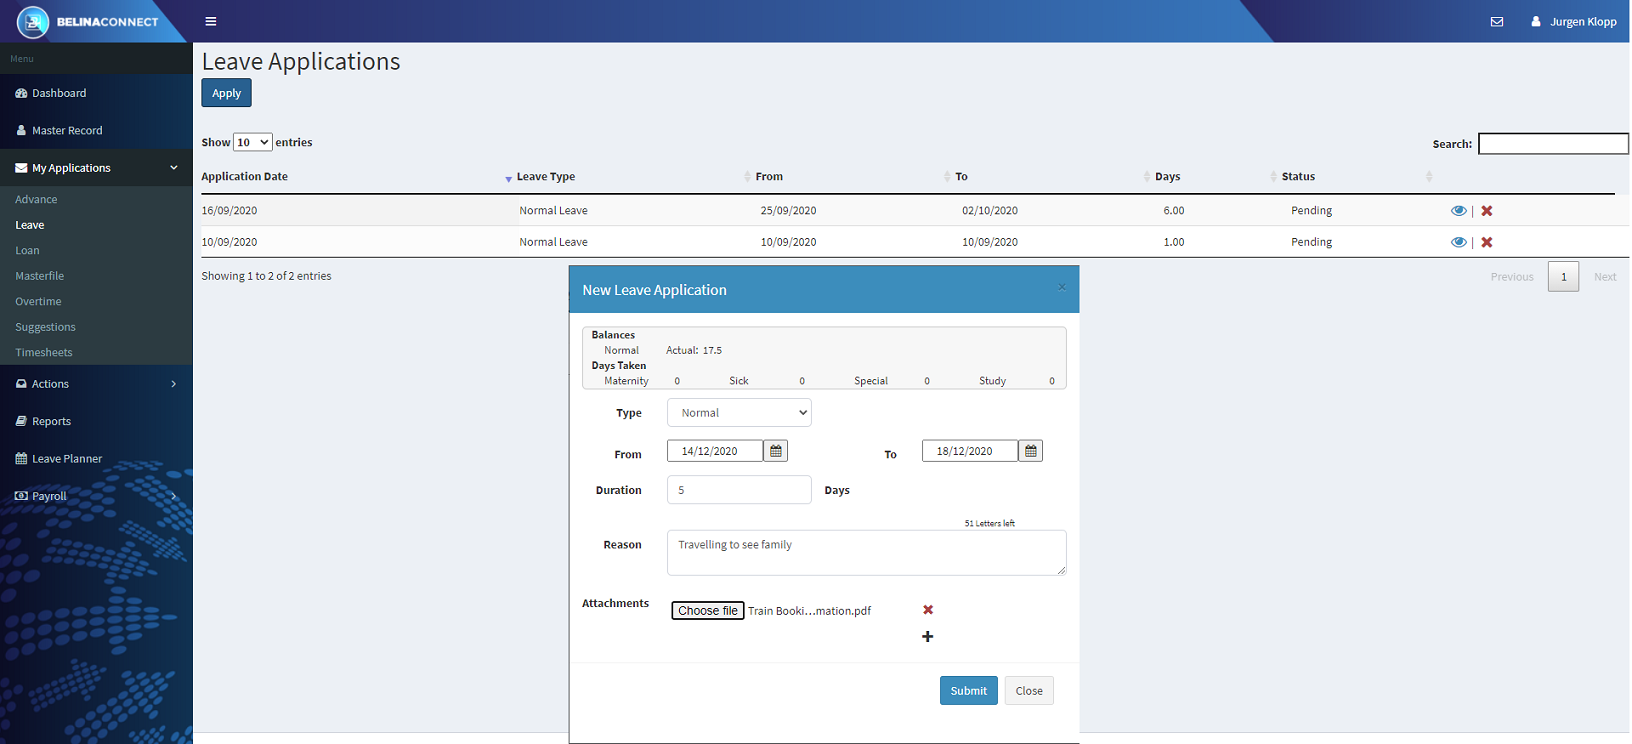
For an employee to apply for Leave: - Select the Orange coloured tile 'Leave', or - Go to the 'My Applications' section of the menu displayed on the left hand side of the screen, - then select 'Leave' - The 'Leave Applications' list screen is then displayed showing current and prior applications. - Press 'Apply' to apply for Leave - A form displays showing the Leave Balance of Normal Leave for the employee. It also shows the number of Days Taken for other types of leave. - The form also allows the employee to enter the details of the leave required: - Use the Dropdown menu to select the type of leave required. - Enter the leave dates 'From' and 'To'. Type in the dates or use the Calendar icon to select the date. - The 'Duration' shows the number of calculated leave days. How the Connect Module knows how to take into account working days and holidays is explained, below, at the end of this Leave topic.
- Enter a 'Reason', if necessary, explaining why the leave is being applied for. - It is optional to attach a supporting document/s. Click 'Choose file' to attach a supporting document. The system takes you to the browser that enables select the file from a folder. Press the '+' field to add another document. . - Press 'Submit' to send the Application to the first person that has been setup on the Approval Path. - The application is then added to the list of applications on the screen.
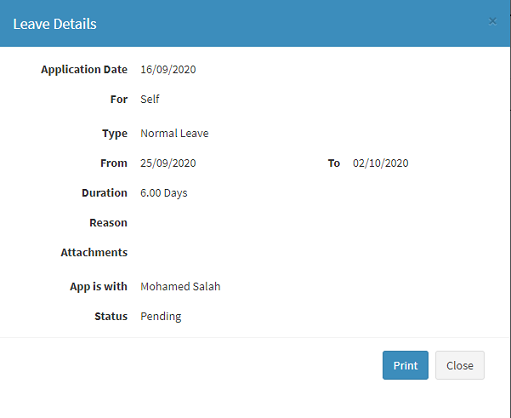
'View Details' It is possible to check an application and/or track its progress by clicking on the 'View Details' (Eye) icon on the right hand side of the listed application. In the example below the Application is with Mohamed Salah who is the first person in the Approval Path. When the Application is finally approved then the 'Status' on the 'Leave Applications' screen, above, will change from 'Pending' to 'Approved' or 'Rejected'. 'Rejected'. .
'Cancel' It is possible to Cancel, or withdraw, an application. The application remains on the list of applications with the changed Status of 'Cancelled'. The application is also removed from further actioning.
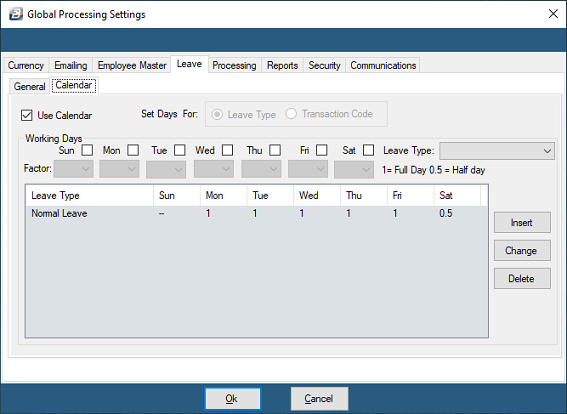
Working days and holidays The Connect Module takes into account working days and holidays in calculating the 'Duration'.
Working days are setup in the payroll under the 'Setup', then 'Global Defaults' menu items. Once there select the 'Leave', then 'Calendar' tabs. This is what the screen looks like:
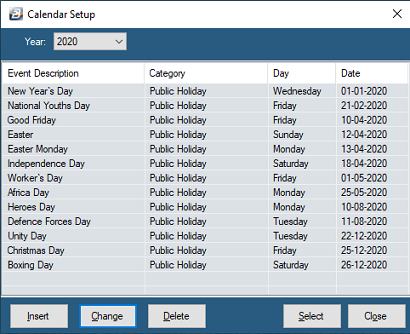
The holidays are setup in the payroll under the 'Setup', then 'Calendar' menu options. This is what the screen looks like:
|
Note: When starting to use the Loan functionality of the Connect Module first Synchronize the Payroll with the Connect Module. In particular ensure that 'Synch Loans Data' has been ticked. If this is not done this error message will be displayed when trying to process a loan application in the Connect Module :'Synch Loans Data from Payroll'.
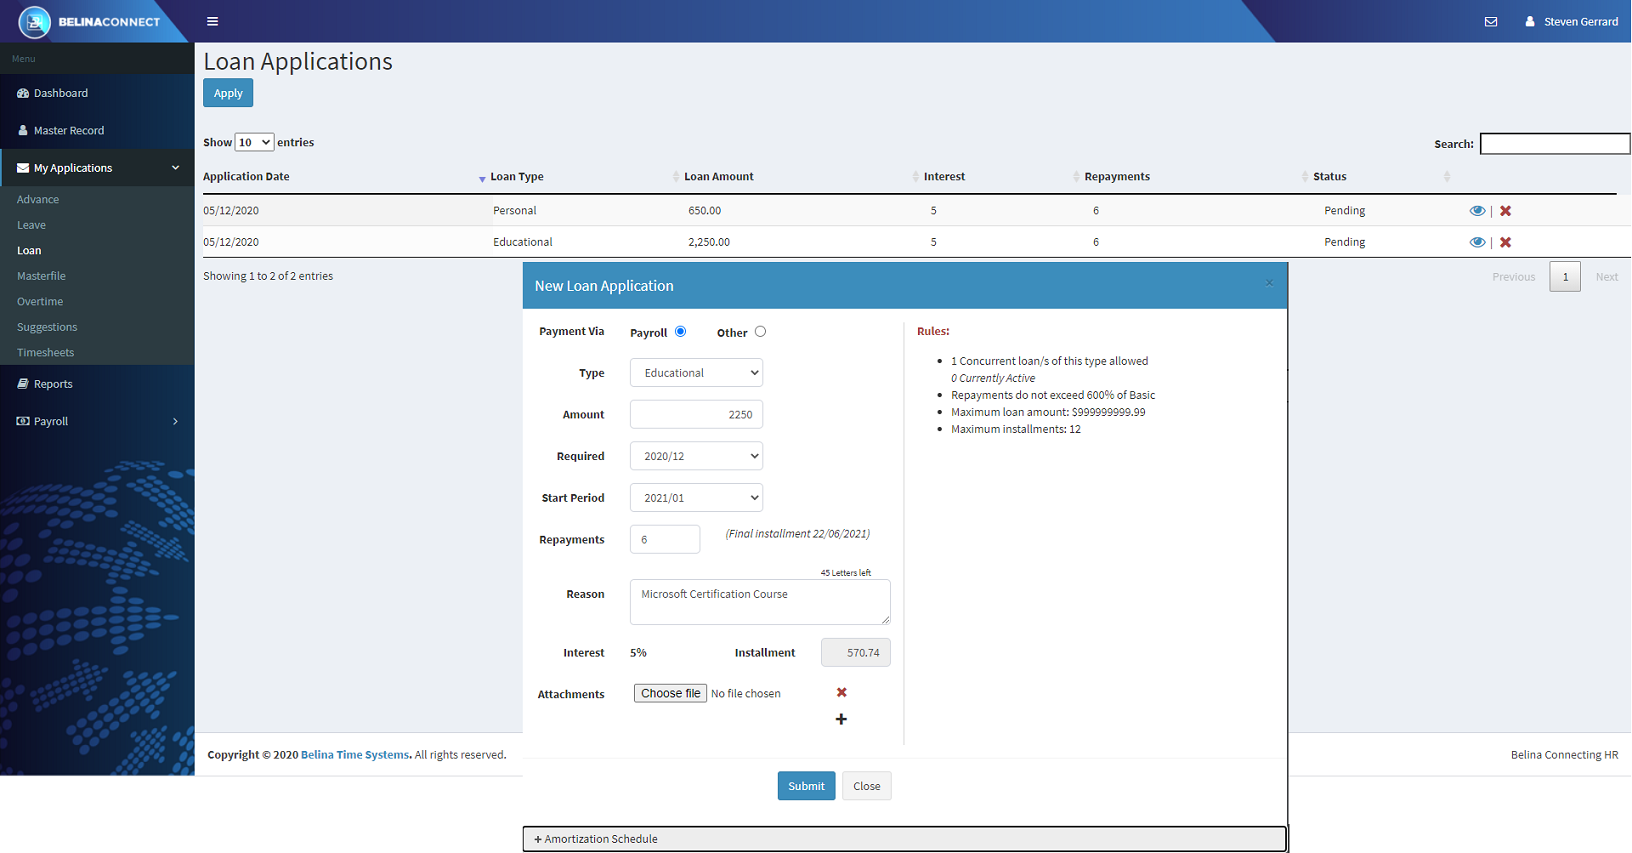
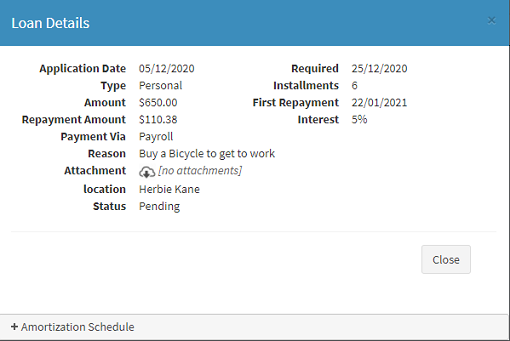
For an employee to apply for a Loan: - Select the Orange coloured tile 'Loan', or - Go to the 'My Applications' section of the menu displayed on the left hand side of the screen, then select 'Loan' - The 'Loan Applications' list screen is then displayed showing current and prior applications. - Press 'Apply' to apply for Loan - Enter details into each field of the form displayed, as follows:
- Press 'Submit' to send the Application to the first person that has been setup on the Approval Path. - The application is then added to the list of applications on the screen.
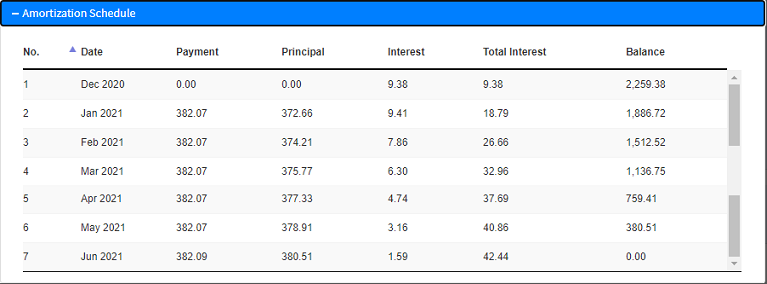
Amortization Schedule Click on 'Amortization Schedule' to see a complete breakdown of the loan repayment schedule with Principal and Interest elements separated.
'View Details' It is possible to track the progress of the application by clicking on the 'View Details' (Eye) icon on the right hand side of the particular Leave Application line on the table. In the example below the Application is with Herbie Kane who is the first person in the Approval Path. When the Application is finally approved then the 'Status' on the 'Loan Application' screen, above, will change from 'Pending' to 'Approved' or 'Rejected'.
'Cancel' It is possible to Cancel, or withdraw, an application. The application remains on the table of applications of the employee with the changed Status of 'Cancelled'. The application is also removed from the actioning inbox of the next person in the Approval Path. |
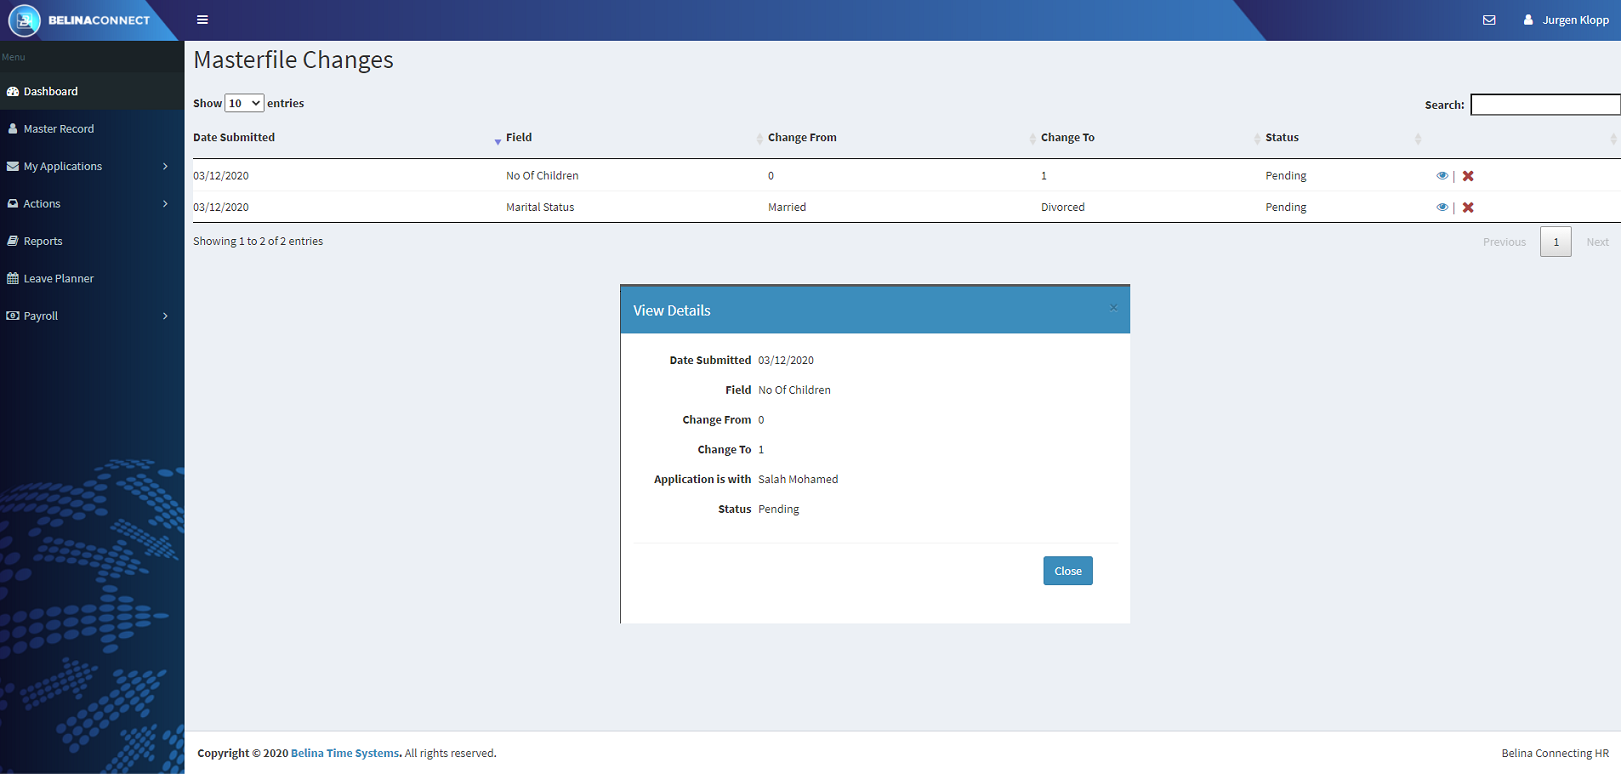
For an employee to make changes to their Masterfile record they need to submit changes using the 'Master Record' menu option which is the first option on the Dashboard menu. These change requests are then listed on the Masterfile list. To access the Masterfile list: - Select the Orange coloured tile 'Masterfile', or - Go to the 'My Applications' section of the menu displayed on the left hand side of the screen, then select 'Masterfile' - The 'Masterfile Changes' list screen is then displayed showing current and prior applications.
The list shows the date a change request was made, which field is being changed. What the entry originally was and what it is being changed to. Finally it shows the status of the application in being approved . 'View Details' It is possible to track the progress of the application by clicking on the 'View Details' (Eye) icon on the right hand side of the particular Masterfile Changes Application line on the table. In the example, above, the Application is with Mohamed Salah who is the first person in the Approval Path. When the Application is finally approved then the 'Status' on the 'Masterfile Application' screen, above, will change from 'Pending' to 'Approved' or 'Rejected'. 'Rejected'.
'Cancel' It is possible to Cancel, or withdraw, an application. The application remains on the list of applications with the changed Status of 'Cancelled'. The application is also removed from further actioning.
|
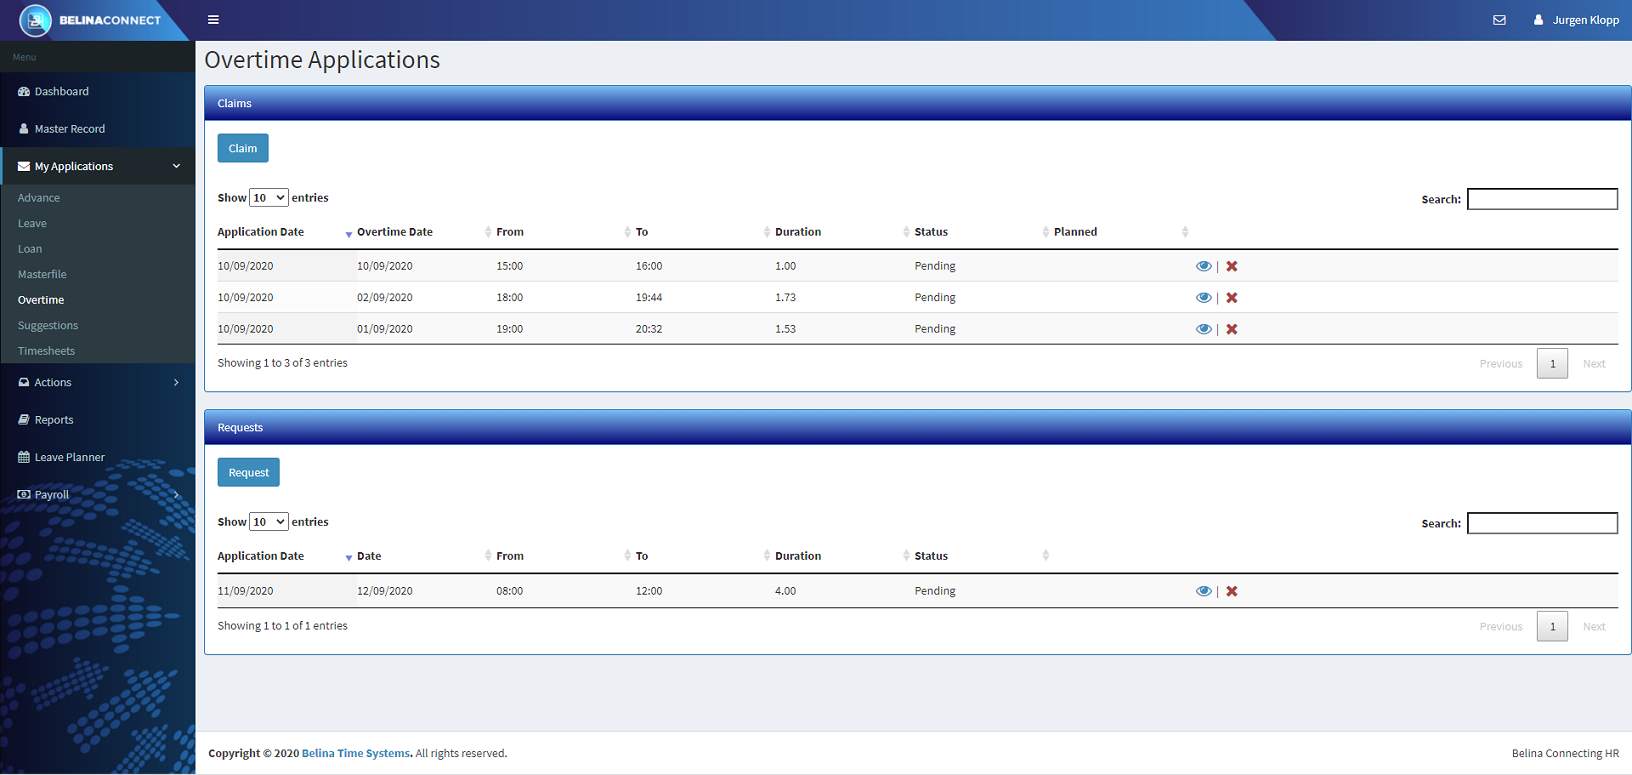
For an employee to apply for Overtime: - Select the Orange coloured tile 'Overtime', or - Go to the 'My Applications' section of the menu displayed on the left hand side of the screen, then select 'Overtime' - The 'Overtime Applications' list screen is then displayed showing current and prior applications for Leave Claims and for Leave Requests.
The difference between an 'Overtime Claim' and an 'Overtime Request' is that a claim is submitting an application for overtime already worked. A Leave Request is an application to work Overtime in the future.
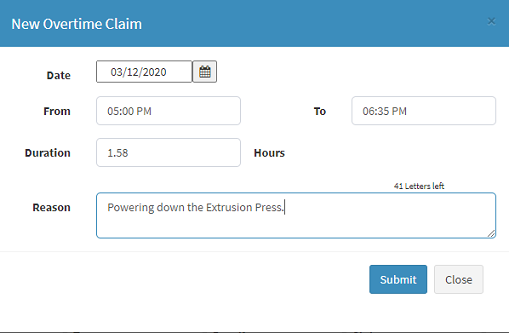
Overtime Claim To Claim overtime already worked: - Press 'Claim' in the top 'Claims' section of the table - A form appears, - Enter the date that the overtime was worked - Enter the time that overtime started in 'From' and when it ended in 'To' - The system computes the number of hours automatically - Enter a reason for the overtime so that those approving the overtime can make an informed decision.
- Press 'Submit' to send the Application to the first person that has been setup on the Approval Path. - The application is then added to the list of applications on the 'Overtime Applications' table.
Overtime Request To Request overtime for hours to be worked in the future: - Press 'Request' in the bottom 'Requests' section of the table - A form appears, - Enter the date that the overtime it to be worked - Enter the times to be worked 'From' and when it is to end under 'To' - The system computes the number of hours automatically - Enter a reason for the overtime so that those approving the overtime can make an informed decision.
- Press 'Submit' to send the Application to the first person that has been setup on the Approval Path. - The application is then added to the list of applications on the 'Overtime Applications' table.
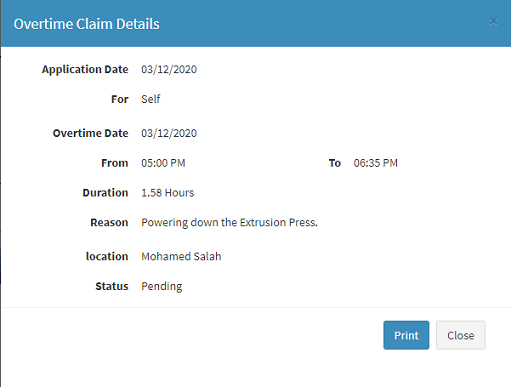
'View Details' It is possible to track the progress of the application by clicking on the 'View Details' (Eye) icon on the right hand side of the particular Overtime Application line on either the 'Claims' or 'Requests' section of the screen. In the example, below, the Application is with Mohamed Salah who is the first person in the Approval Path. When the Application is finally approved then the 'Status' on the 'Overtime Applications' screen, above, will change from 'Pending' to 'Approved' or 'Rejected'. .
'Cancel' It is possible to Cancel, or withdraw, an application. The application remains on the list of applications with the changed Status of 'Cancelled'. The application is also removed from further actioning.. |
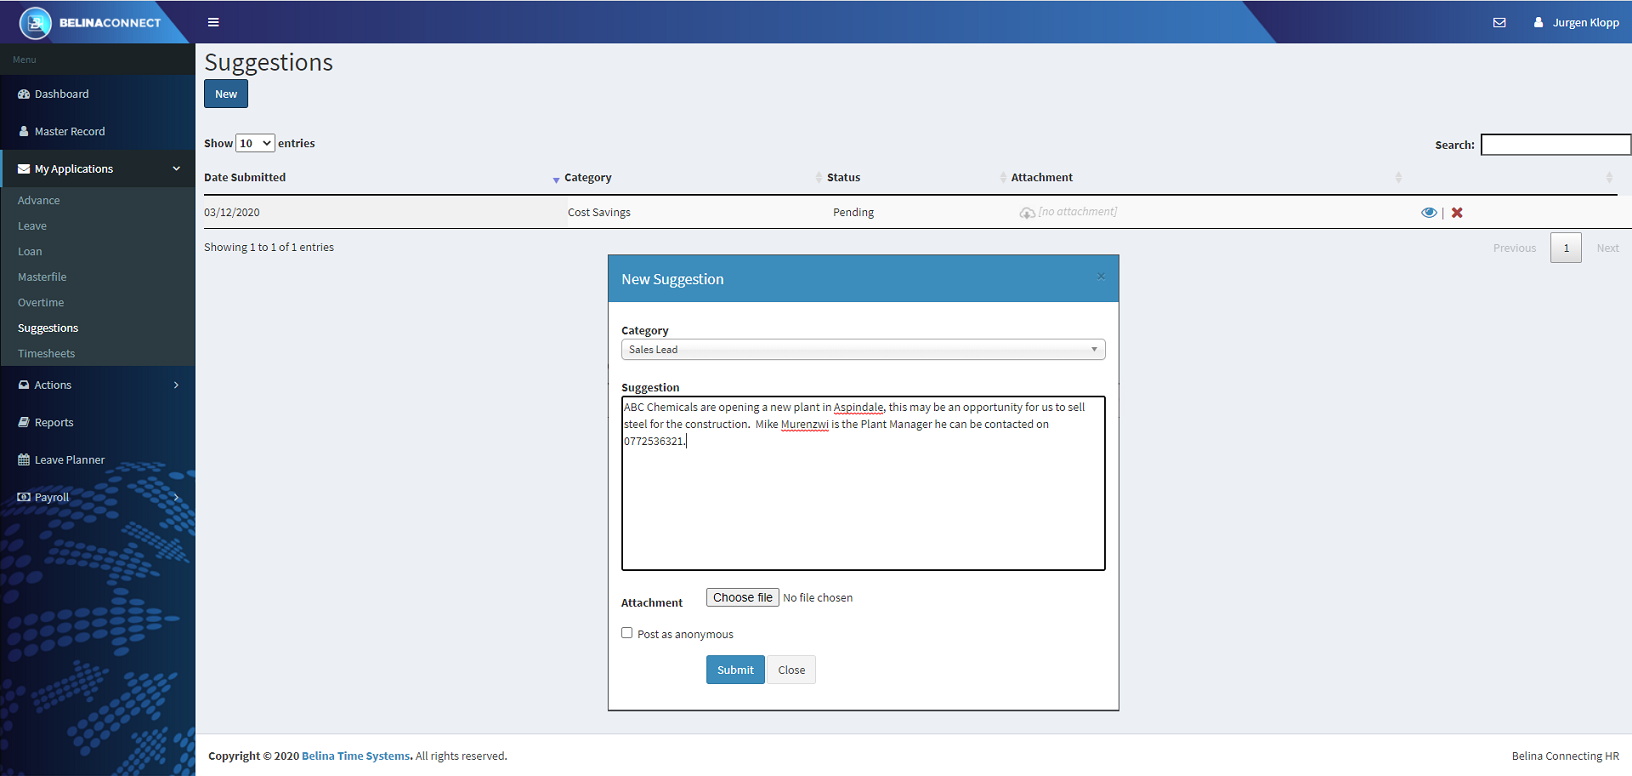
For an employee to put forward a Suggestion: - Select the Orange coloured tile 'Suggestion', or - Go to the 'My Applications' section of the menu displayed on the left hand side of the screen, then select 'Suggestions' - The 'Suggestions' list screen is then displayed showing current and prior suggestions that have been submitted. - Press 'New' to submit a new application - Select a 'Category' of suggestion - Attach any supporting documents - Tick the checkbox against 'Post as Anonymous' if you do not want your name to go through with the submission.
Categories of Suggestion available:
|

|
To setup Timesheet parameters the Administrator goes to the: - 'Admin', then 'Settings' menus in the Connect Module, and - Selects the 'Timesheets' tab.
Setup: - the week start day or date, and - the standard hours per day.
Submit a Timesheet For an employee to submit a Time Sheet: - Select the Orange coloured tile 'Timesheets', or - Go to the 'My Applications' section of the menu displayed on the left hand side of the screen, then Select 'Timesheets' - Select 'Daily' or 'Weekly' Input
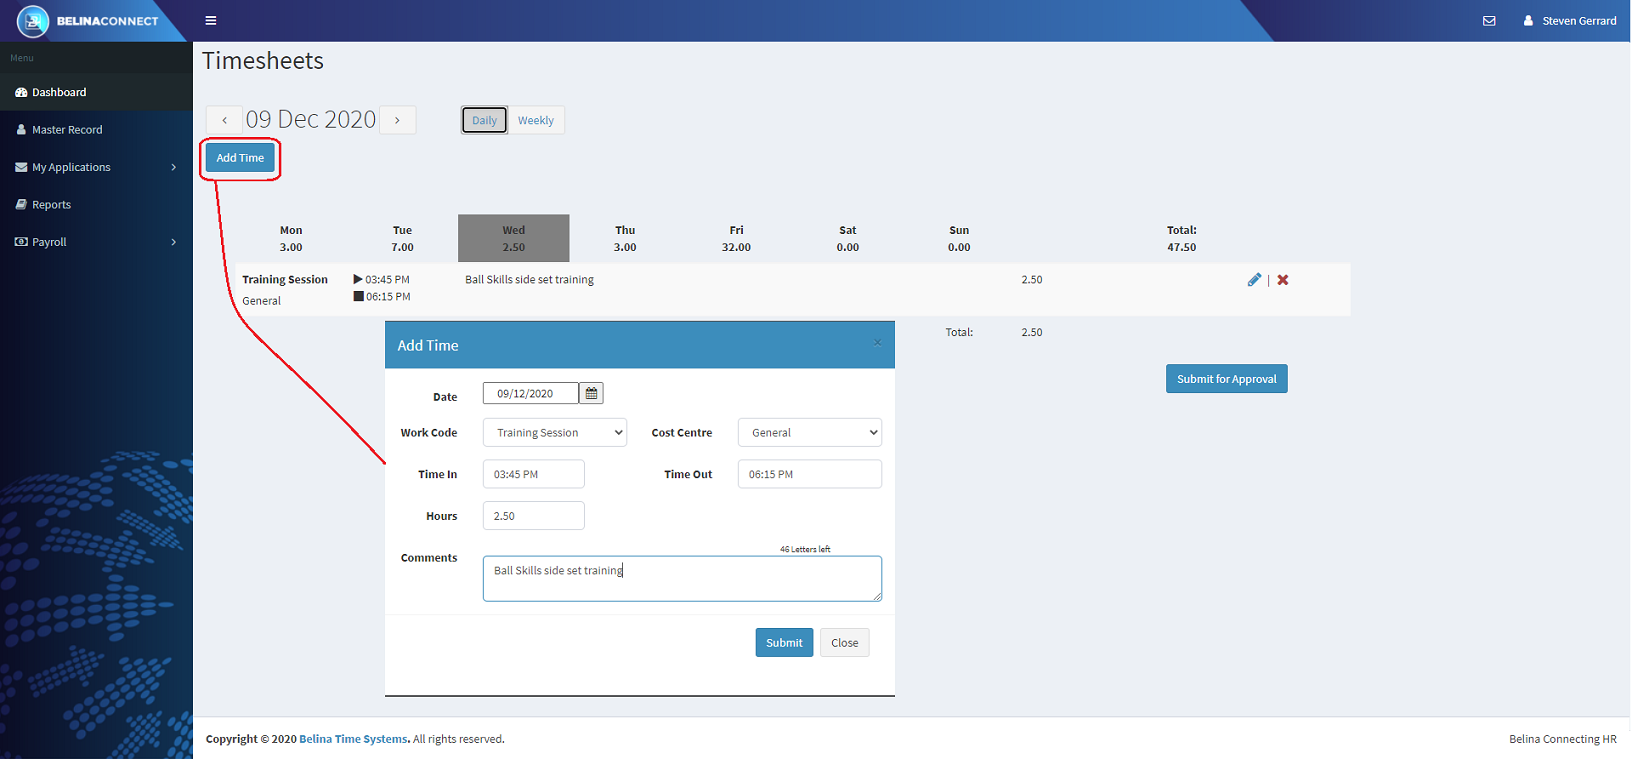
Daily Input Daily input allows the entry of several Work Codes with times against each with comments. - Having Selected the 'Daily' button - Select the default Date, in the example below it is '05 December 2020' - Press 'Add Time' - Enter the 'Date' that the work was done - Use the dropdown menu to select the 'Work Code'. Work Codes are setup in the Time Control Module under the 'Edit' menu. - Enter the Time 'In' and the Time 'Out' to be applied to the Work Code - Enter any comments that may be appropriate. - Press 'Submit' to have the Time record sent for approval.
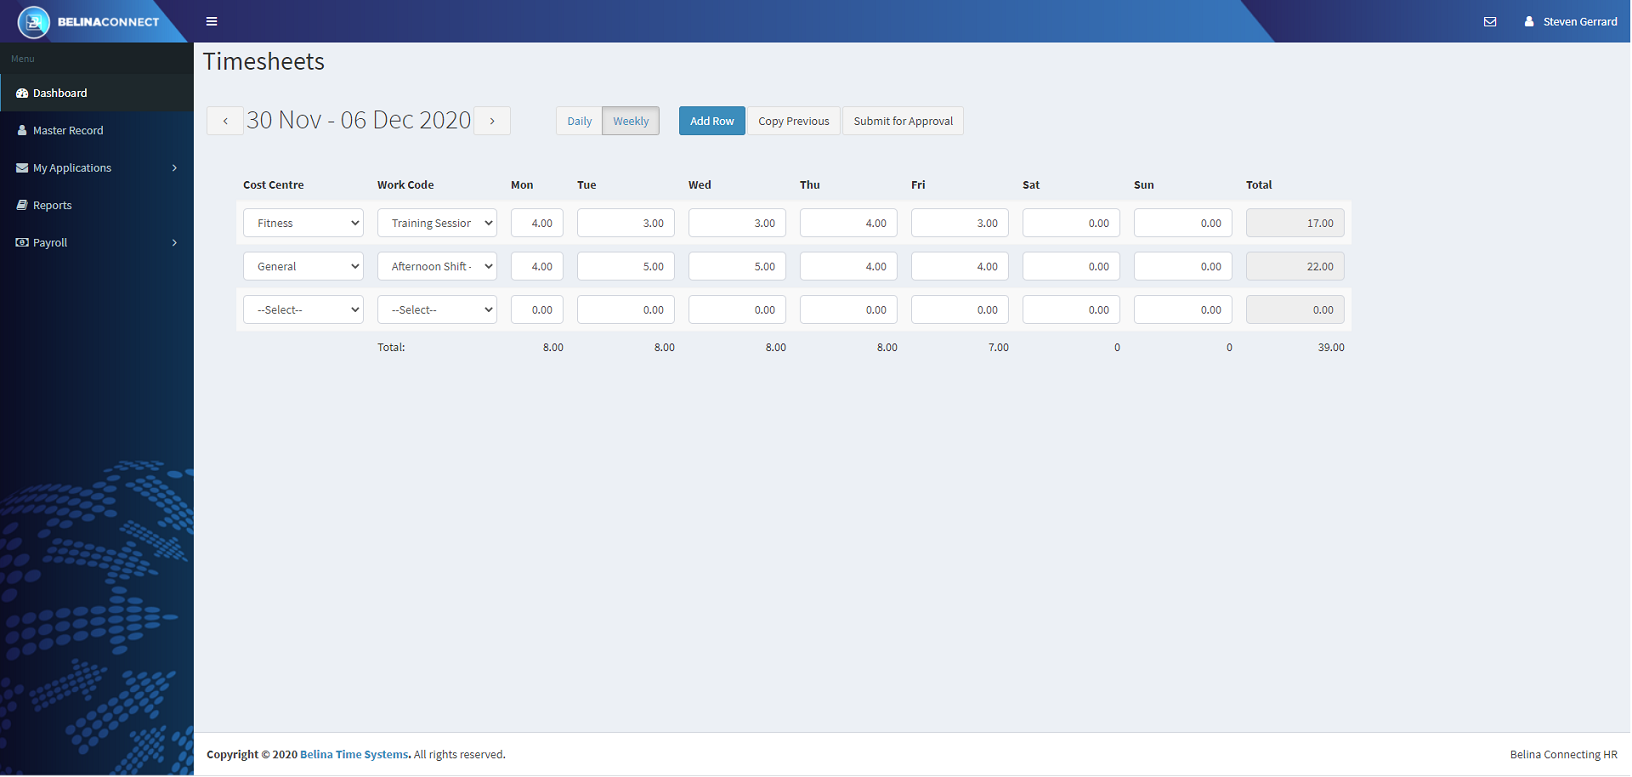
Weekly Input Weekly input allows the entry of a workcode for each day of the working week - Having Selected the 'Weekly' button - Select the default Week, in the example below it is '30 November - 06 December 2020' - Press 'Add Row' - A new data input row appears - Select from the dropdown menus the 'Cost Centre' and the 'Work Code' - Enter the times into each day of the working week - To add more times for the week press 'Add Row' again so that another data capture line appears. - When complete press 'Submit' to have the Time record sent for approval.
The work week is setup in Connect Settings. |