![]() Configuration File and Server Settings
Configuration File and Server Settings
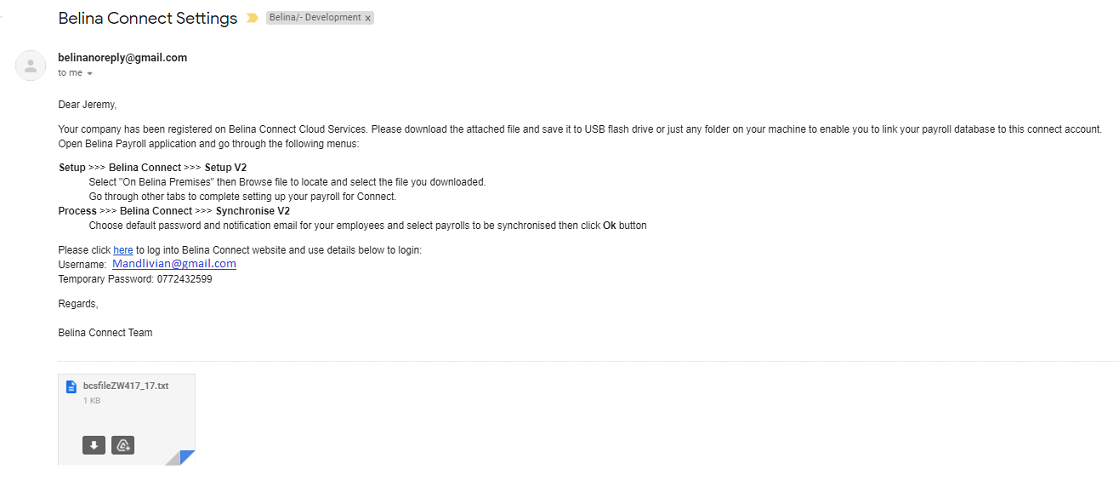
Belina will send you an email it will have: •an attached configuration file •login details, and •a link to the Belina Connect website.
- Download the attachment to onto your computer, noting the folder in which it has been stored.
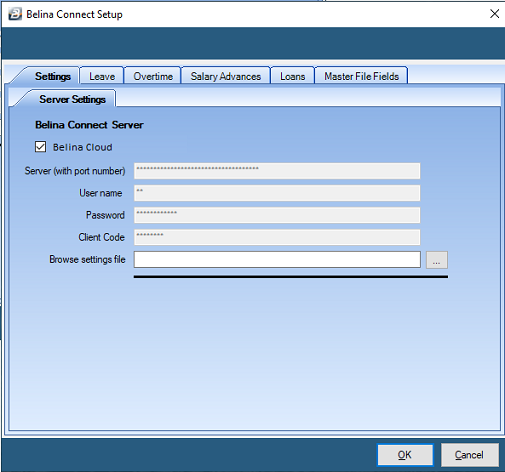
To open the Configuration File: - Go to the 'Setup', 'Belina Connect', 'Setup V2' menu options - The Belina Connect 'Settings' screen displays. - Check the “Belina Cloud” checkbox to have Belina Connect use the Belina hosting service. The settings come through automatically - If Belina Connect is to be hosted on your premises the leave the 'Belina Cloud' checkbox unticked. Fill in the Server details. This may require the assistance of your systems administrator and/ or a Belina Support person. - Click the 'Browse settings file' field elipsis button - Search for the downloaded file, highlight it and press 'Open' - Click 'OK' now, or after setting up the other Settings tabs, to save the settings. - a notification then displays showing that the settings have been successfully saved.
|
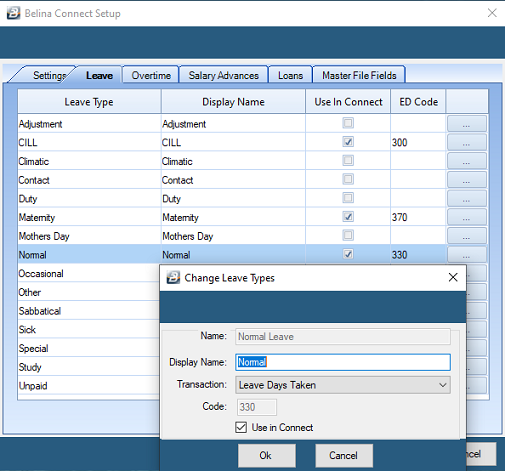
To setup which Leave types will be processed in Belina Connect: - if the setup options are closed - Go to the 'Setup', 'Belina Connect', 'Setup V2' menu options, then select the 'Leave' tab. Otherwise just select the 'Leave' tab - Click on the ellipsis button against the leave type you want to give access to - Type in the 'Display Name' to come through to Belina Connect. 'Transaction' is the Transaction Code description used in the payroll. - Check the “Use in Connect” to allow employees to apply for this leave type. - Repeat the process for other leave types. - Click 'OK' now, or after setting up the other Settings tabs, to save the settings. - a notification then displays showing that the settings have been successfully saved.
|
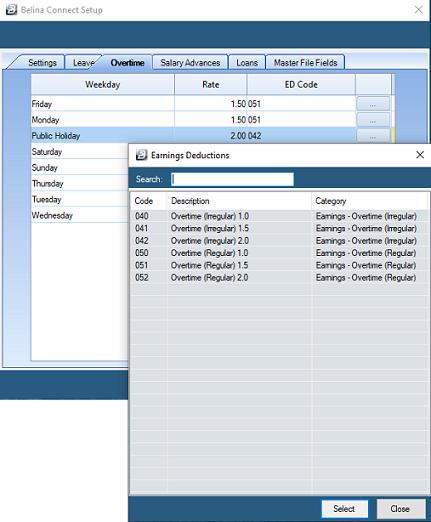
To setup which Overtime types will be processed in Belina Connect: - if the setup options are closed - Go to the 'Setup', 'Belina Connect', 'Setup V2' menu options, then select the 'Overtime' tab. Otherwise just select the 'Overtime' tab - Click on the ellipsis button against the Overtime type that applies to overtime worked on a particular 'Weekday' - Select the Transaction Code that would be applied to that Weekday. - Repeat the process for other Weekday overtimes. - Repeat the process for other leave types. - Click 'OK' now, or after setting up the other Settings tabs, to save the settings. - a notification then displays showing that the settings have been successfully saved.
|
To setup Salary Advances to be processed in Belina Connect: - if the setup options are closed - Go to the 'Setup', 'Belina Connect', 'Setup V2' menu options, then select the 'Salary Advances' tab. Otherwise just select the 'Salary Advances' tab - Click on the dropdown menu or ellipsis button against 'ED Code' to select the Transaction Code that is used in the payroll to record advances. - Setup the Advance application rules:
- Click 'OK' now, or after setting up the other Settings tabs, to save the settings. - a notification then displays showing that the settings have been successfully saved.
|

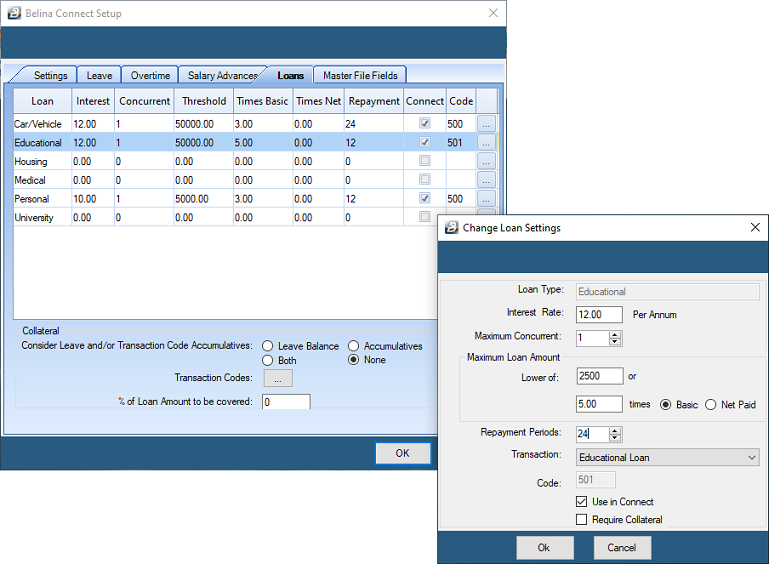
•To setup how Loans are to be processed in Belina Connect: - if the setup options are closed - Go to the 'Setup', 'Belina Connect', 'Setup V2' menu options, then select the 'Loans' tab. Otherwise just select the 'Loans' tab - Click the elipsis button against each of the loan types - Setup the Loan application rules:
Collateral: Consider Leave and/or Transaction Code Accumulatives taking into account the value of either, Leave Balance and/ or Accumulatives, or none.
- Click 'OK' now, or after setting up the other Settings tabs, to save the settings. - a notification then displays showing that the settings have been successfully saved.
|
![]() Enter Masterfile Field Settings
Enter Masterfile Field Settings
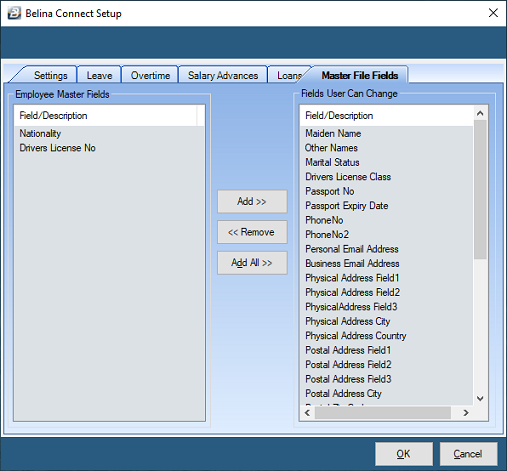
To setup which Employee Master Fields can be edited by employees in in Belina Connect: - if the setup options are closed go to the 'Setup', 'Belina Connect', 'Setup V2' menu options, then select the 'Master File Fields' tab, if not - select the 'Master File Fields' tab - A list of payroll 'Employee Master Fields' that can be opened to Employees to update through the Connect Module are listed on the left hand side of the screen. - Use the 'Add>>' and 'Add All>> buttons to move the available payroll fields into the right hand column of fields available to Employees to edit. - Use the '<<Remove' button to de-select a Field from the list of fields available to Employees to edit. - Click 'OK' now, or after setting up the other Settings tabs, to save the settings. - a notification then displays showing that the settings have been successfully saved.
|
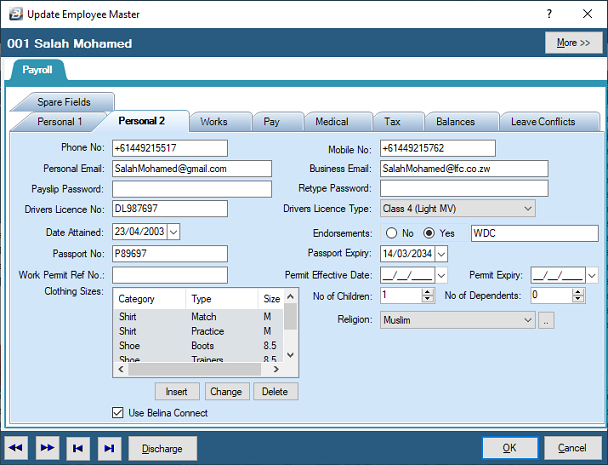
![]() Setup Connect Users in each Employee Master
Setup Connect Users in each Employee Master
Enabling Employee's to use Belina Connect: To setup an employee to access Belina Connect enter valid email address details into each employee's Masterfile record. To do this: - Go to 'Edit' then 'Employee Master' menu options - Select the employee to be edited, then - Click on the “Personal 2” tab - Enter valid email address details. These will be used for the employee to log into the Connect Module and also to receive Connect notifications. Setup either the personal or business email address for all employees. This should be consistently applied for all employees in the organization. - To activate the employee on Belina Connect check the “Use Belina Connect” box - Click on OK to save changes. These will be transferred to the Belina Connect Module when the systems are next synchronized (see below). |
![]() Synchronize Payroll to Connect Module
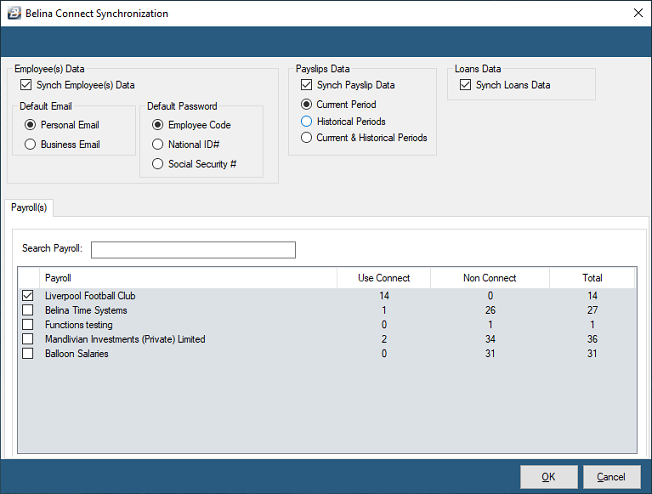
Synchronize Payroll to Connect Module
The Synchronize feature is used to transfer data to and from the Belina Connect Module.
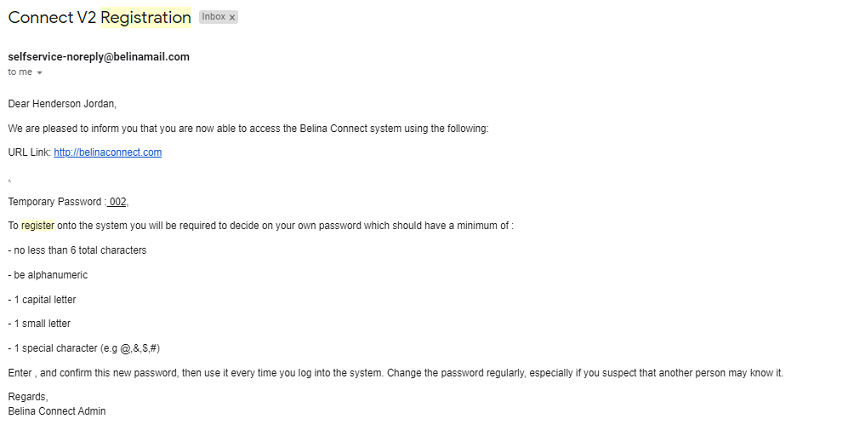
To access the Synchronization process" - Go to the 'Process', 'Belina Connect' and 'Synchronize V2' menu options The Connect Module will receive: •New employee details, •Terminated employees will be de-activated in Connect. The employee will not be able to log into the system. •Employee master updated details •Updated balances of Leave and Loans The Payroll will receive: •Approved Employee Master changes and approved application data for Leave, Loans, Overtime and Advances New Employees, setup for Connect, will receive: - an email inviting them to use Belina Connect together with a Username and temporary password. See 'Belina Connect V2 Registration' email.
Once the Sychronization is complete a report is given:
An email is automatically sent to all Employees newly registered in the payroll as Connect users: To register an employee as a Connect User, simply tick 'Use Belina Connect' on that employee's Employee Master 'Personal 2' tab.
|