-
|
Ensure that the rate of pay for each individual has been updated in their Employee Master. This can be done by entering each new pay rate in the employee master, updating the NEC rate if NEC grade rates are being applied, or doing a Pay Increase.
|
-
|
Make a backup of your data
|
-
|
Take a note of what Transaction Codes are being backpaid. In our example it is Basic Pay, Overtime 1.5, Overtime 2.0 and Shorttime are being backpaid.
|
-
|
Take a note of the Transaction Categories for each of these Transaction Codes, which in our example are 'Earnings - Basic', 'Earnings - Overtime' for the two overtime codes and 'Earnings - Shorttime'.
|
-
|
Go to the 'Edit', 'Transaction Code' menu options
|
-
|
Create a Backpay code for each of the Transaction Codes being backpaid using the same Transaction Category for each.
|
-
|
Accept or change the default Transaction Code given.
|
-
|
Enter a description, normally we would keep the same description as the Code being backpaid with the word 'Backpay' as the first word, eg. 'Backpay - Basic Pay'
|
-
|
Set the transaction 'Duration' to 'Single' so that the transaction does not recur in future periods.
|
-
|
Set any other parameters that are required, example under overtime enter the rate of 1.5 and 2.0
|
-
|
Then we go to the Backpay Module under 'Utilities', 'Backpay'.
|
-
|
Note the warning to do a backup. If you have made the backup proceed. If not, go back and do a backup.
|
|
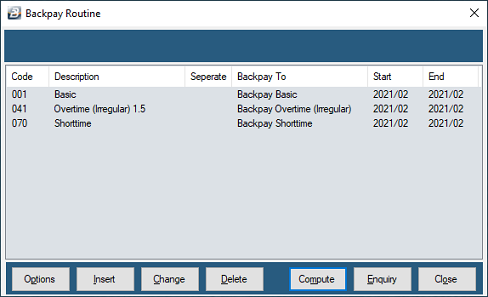
If this is the first time you have done a backpay then you are now presented with a blank table. Press 'Insert' to add the first Transaction Code being backpaid and the corresponding backpay code. Use the dropdown menus to select the Transaction Codes required, notice that the system guides you to the correct backpay code by only displaying transactions with the same Transaction Category as the transaction being backpaid:
|
-
|
Enter the 'Start Period' and 'End Period' for the periods that are to be included in the backpay. This could be different for each of the Transaction Codes being backpaid.
|
-
|
Do the same for the other Transaction Codes being backpaid.
|
-
|
The 'Options' button allows you to select individuals, or groups of individuals to be included in the backpay.
|
-
|
Press the 'Compute' Button
|
-
|
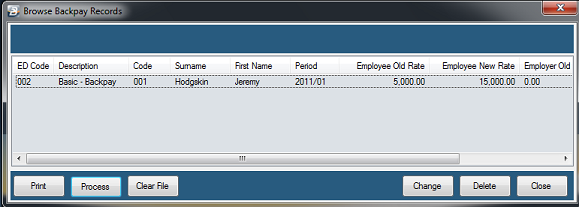
A preview is then displayed of the backpay. Check to ensure the results are what you were expecting.
|
-
|
If you notice amounts to be changed use the 'Delete' and 'Change' buttons to delete or amend records. Alternatively press 'Clear File' go back and do the necessary adjustments and then start the backpay procedure again from the start.
|
-
|
|
-
|
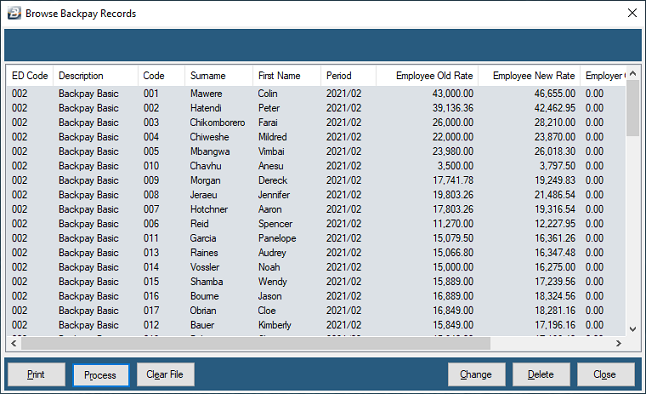
Check that the results have been correctly transferred to the employees. To do this go to 'Payslip Input' and check the backpay amounts that have come through.
|
-
|
If you find that the results are not what you expected, or you do not want to lock in the transactions, you can always press 'Clear File'. That will clear the backpay processed completely and allow you to start again.
|
-
|
When satisfied with the results press 'Process'. Even after processing it is possible to reverse the backpay. This can be done by pressing the 'Enquiry' button on the screen displayed above.
|
-
|
You will then be shown the table of backpay transactions with the 'Clear File' button, which can be pressed to clear transactions that were posted to the payslips.
|
