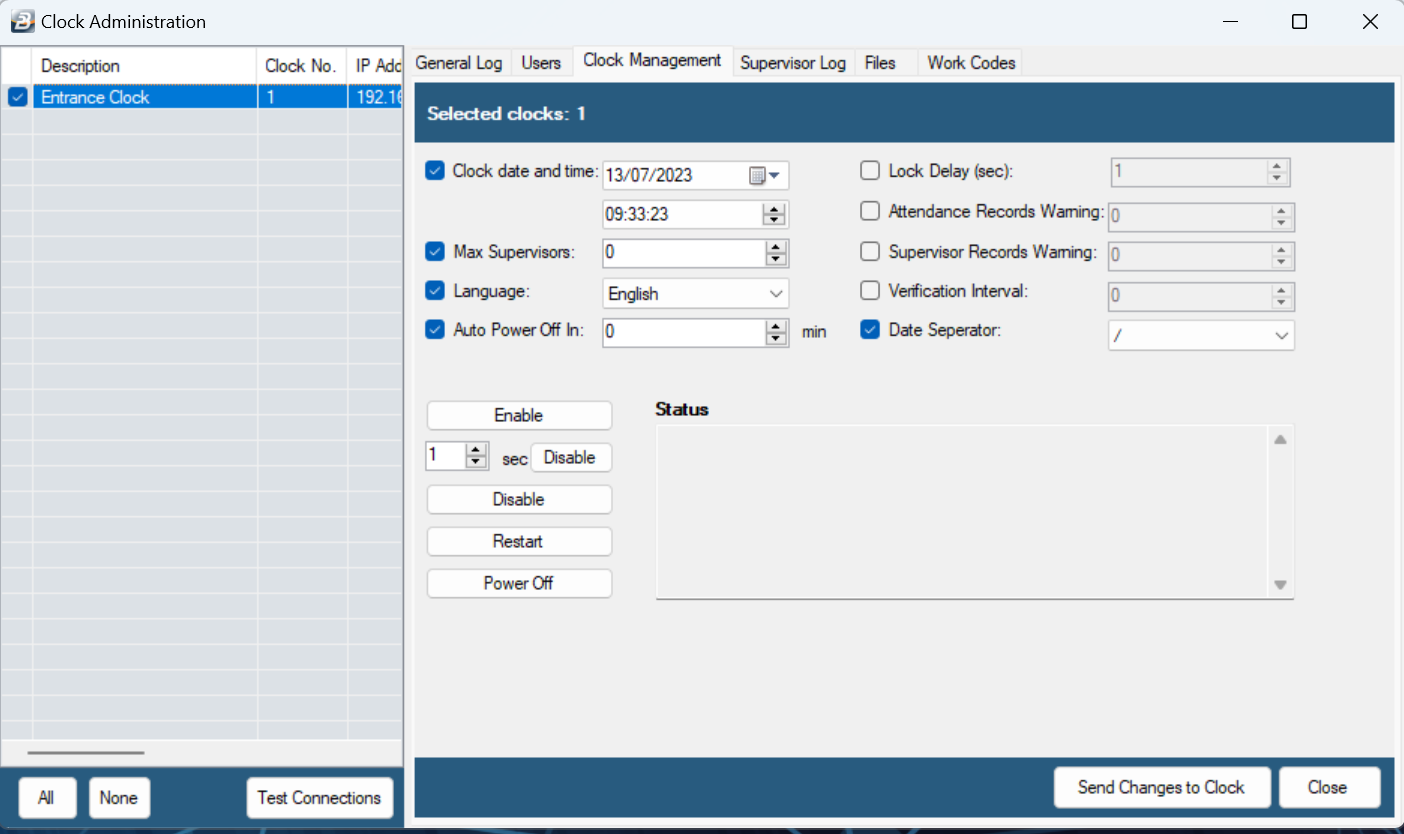
You can change certain settings of the terminal/ clock remotely over the network. The following listing are the settings that can be can be changed over the network.

Clock date and time:
This option will change the clock / terminal clock and time
•Tag the clock and date check box and enter the correct date and / date
•Click on the ‘Send Changes to Clock’ button to effect the changes
Max Supervisors
This sets the maximum possible number of clock administrators on the clock. To change the value:
•Tag the Max Supervisors option and enter the desired value.
•Click on the ‘Send Changes to Clock’ button to effect the changes.
Language
You can change the language in which the clock gives feedback to input. The possible selections are English, Ndebele and Shona. To change the clock language:
•Tag the Language check box and then select the desired language from the drop - down box.
•Click on the ‘Send Changes to Clock’ button to effect the changes.
Auto Power Off
This option is currently work in progress.
Enable
This is used to re-activate clock functionality after a user has disabled clock functionality.
There might be some rare instances where the clock might not respond to input (fingerprint inserted on the reader or keypresses). This is most likely caused by attempting to download an attendance log that has grown too big (over 1 MB). The enable button will terminate any operation the clock running to make it responsive to user input.
To enable the clock click on the ‘Enable’ button.
Disable
This features disables all clock functionality. It could be used to block employees from clocking in and out after a certain cut off period.
•To enable clock functionality you have to push in the reset button the clock left side of the clock or enable through the software.
Restart
This options will restart the clock. To restart the clock:
•Click on the ‘Restart’ button. This will restart the device as long as the clock is actively connected to your computer over the network.
Power Off
This option will turn off the clock. To turn off the clock:
•Click on the ‘Power Off button. This will restart the device as long as the clock is actively connected to your computer over the network.
•Please note that once the clock has been switched off, you will have to physically turn it on.
Lock Delay
This function is used in conjunction with access control hardware where you set the maximum time, in seconds, that is allowed for a person to go through the access point. The lock will close after this period. To enter the Lock Delay:
•Place a tick/ Click on the 'Lock Delay' checkbox
•Once all the selections have been made, click the button 'Send Changes to Clock'.
Attendance Records Warning
Enter the threshold of attendance records that can be stored on the clock/ terminal before a warning message is displayed on the clock/ terminal stating that the terminal should be cleared. To enter the threshold:
•Place a tick/ Click on the 'Attendance Records Warning' checkbox
•Enter the number of records allowed before the warning displays. Each terminal type has a different capacity. The capacity is stated on a terminal menu within the system.
•Once all the selections have been made, click the button 'Send Changes to Clock'.
Supervisor Records Warning Thamu/ Tunga
Enter the threshold of supervisor records that can be stored on the clock/ terminal before a warning message is displayed on the clock/ terminal stating that the terminal should be cleared. To enter the threshold:
•Place a tick/ Click on the 'Supervisor Records Warning' checkbox
•Enter the number of records allowed before the warning displays. Each terminal type has a different capacity. The capacity is stated on a terminal menu within the system.
•Once all the selections have been made, click the button 'Send Changes to Clock'
Verification Interval
This function is used to determine the amount of Interval (pause time) there should be between readings. To enter the Verification Interval :
•Place a tick/ Click on the 'Verification Interval' checkbox
•Enter the number of seconds required.
•Once all the selections have been made, click the button 'Send Changes to Clock'.
This procedure prevents an employee unintentionally recording two, or more, transactions in cases where he/ she is unaware that the first transaction has been successfully recorded. It also gives time for the first employee to move away and then be ready to receive the next employee record.
Date Separator
To enter the preferred 'Date Separator' either a '/' : 13/07/2023 or a '-' : 13-07-2023'
•Place a tick/ Click on the 'Date Separator' checkbox
•Enter the preference using the dropdown menu.
•Once all the selections have been made, click the button 'Send Changes to Clock'.